System Verilog期末复习 题型:
SV中的数据类型 线网 :net tpye 与verilog类似
变量 variable
Reg/logic/Bit /byte/shortint/int/longint
增加了2值数据类型
logic: 4值数据类型 其中reg被logic完全代替,但logic不能被多驱动 )
1
2
3
4
reg a;assign a = xxx; logic a;assign a = xxx;
1
2
3
4
5
6
7
8
9
10
11
12
13
14
module LDT(input logic res);logic q, qn, d, clk, resl;initial begin clk <= 0 ; forever #5 clk=~clk;end assign resl=~res;not a(qn,q);DFF D(q, d, clk, resl); endmodule
logic的使用更加自由,用作端口连接信号时不受限制。
2值数据类型 (用于testbench)
byte
shortint
int
longint
注意区分logic[7:0] x 与 byte x 的区别
1.byte是有符号的,并且只有2值(0和1)
使用$isunknown来判断x和z
1
2
if ($isunknown (iport)==1 )$display (“ 4 -state variable detected”);
Array/ Dynamic arrays/Associative arrays/Queues verilog中的向量:
1
2
3
4
wire [msb:lsb] data;wire [3 :0 ] data_in;reg [3 :0 ] data_out;
寄存器组可以用来建模 ROM,RAM(6个晶体管实现1位存储),RF(register file,26个晶体管实现1位存储)。
1
2
3
4
5
6
7
8
9
10
11
12
reg [msb:lsb] memory[upper:lower];reg [7 :0 ] memory1 [0 :63 ]; reg mema [1 :5 ]; reg [1 :5 ] rega; rega = 0 ; mema = 0 ; mema[1 ] = 0 ; reg arrayb[7 :0 ][0 :255 ];
上述代码中,初始化操作mema=0不合法,同时对硬件(SRAM)来说,初始化同样没有实现机制。
在设计中,对memeory的单比特访问同样不推荐(mem[a][b]),因为对硬件来说一般会直接读整个字。
对向量的赋值
1
2
3
4
5
6
7
8
9
10
11
12
13
14
module test_vector();parameter SIZE=64 ;reg [SIZE-1 :0 ] data1;logic [SIZE-1 :0 ] data2;initial begin data1=0 ; #5 $display ("%b" ,data1); data1='bz ; #5 $display ("%b" ,data1); data1='bx ; #5 $display ("%b" ,data1); data1=64'hFFFFFFFFFFFFFFFF ; #5 $display ("%b" ,data1);
packed和unpacked Array:
1
2
bit [7 :0 ] c1; real u [7 :0 ];
一维的packed Array相当于vector
Packed Array只能被声明为单比特的数据类型。
1
2
3
4
5
bit [3 :0 ][7 :0 ]bytes;bytes=32 ’habcd_efab; $displayh (bytes bytes[3 ] bytes[3 ][7 ]);
Unpacked Array可以被声明为任何数据类型,一般用于一些比较复杂的数据结构。
1
2
int lo_hi[0 :15 ]; int lo_hi[16 ];
读写问题:
1
2
3
4
5
6
7
8
9
10
11
12
13
module test_outboundry();byte array1 [2 ][2 ];logic [7 :0 ] array2 [2 ][2 ];initial begin array1[1 ][1 ]=255 ; array2[1 ][1 ]=255 ; #5 $display ("%d" ,array1[1 ][1 ]); #5 $display ("%d" ,array2[1 ][1 ]); #5 $display ("%b" ,array1[3 ][3 ]); #5 $display ("%b" ,array2[3 ][3 ]); end endmodule
Unpacked Array 的初始化
顺序为:从左往右从低到高
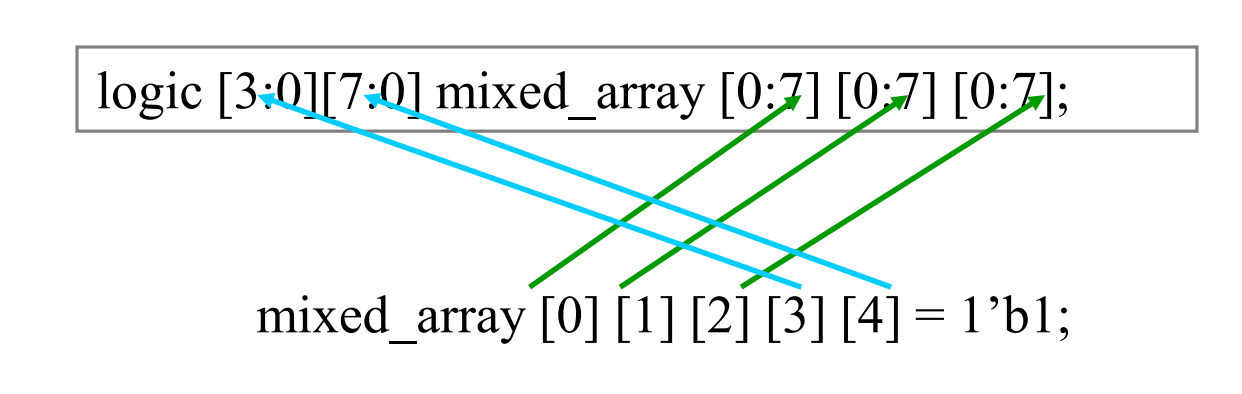
混合使用: mixed Array
举例:
理解,每一行(连续的内存空间),是一个[3:0][7:0]的packed array,而纵向是unpacked 的。
Packed Array 和Unpacked Array比较 :
Packed Array:
紧凑存储:Packed array 的所有元素都是紧密排列的,没有间隙。这意味着整个数组可以被视为一个单一的、连续的位向量。
位级操作 :由于其连续的存储方式,可以对整个 packed array 进行位级操作,如位移、逻辑运算等。定义方式:在声明数组时,packed 维度紧随数据类型之后。例如:bit [3:0] packedArray; 表示一个4位的 packed array。
应用场景:通常用于硬件建模,如总线接口、寄存器等,因为它们可以映射到硬件中的连续位。
Unpacked Array:
分散存储:Unpacked array 的元素在内存中可能是分散存储的,每个元素可以独立寻址。
元素级操作 :通常对 unpacked array 的操作是在元素级别进行的,如数组的遍历和单个元素的访问。定义方式:在声明数组时,unpacked 维度跟在变量名之后。例如:int unpackedArray [10]; 表示一个有10个整数的 unpacked array。
应用场景:常用于表示复杂的数据结构,如队列、堆栈、记录等,以及在验证和建模过程中处理大量数据。
quiz
What is the basic difference between logic and reg?
What is the difference between logic and bit?
Should the 2-state variable be used with the DUT?
动态数组 Dynamic Array 定义方式:
1
2
3
4
bit [3 :0 ] nibble[]; integer mem[2 ][];
Dynamic Array是unpacked的。
用法:本质是一个内置的对象类型,具有new,size,delete等方法。
1
2
3
4
5
6
7
8
9
10
11
12
13
14
15
16
17
18
19
20
module test_da(); int dyn[], d2[]; initial begin dyn=new [5 ]; foreach (dyn[j]) dyn[j]=j; d2=dyn; d2[0 ]=5 ; [5 ,1 ,2 ,3 ,4 ] $display (dyn[0 ],d2[0 ]); dyn=new [10 ](dyn); $display ("%p" ,dyn); dyn=new [20 ]; $display ("%p" ,dyn); dyn.delete (); $display (" %d" ,dyn.size ()); end endmodule
注意以上2中new的区别,是用原来的array初始化还是重新初始化。
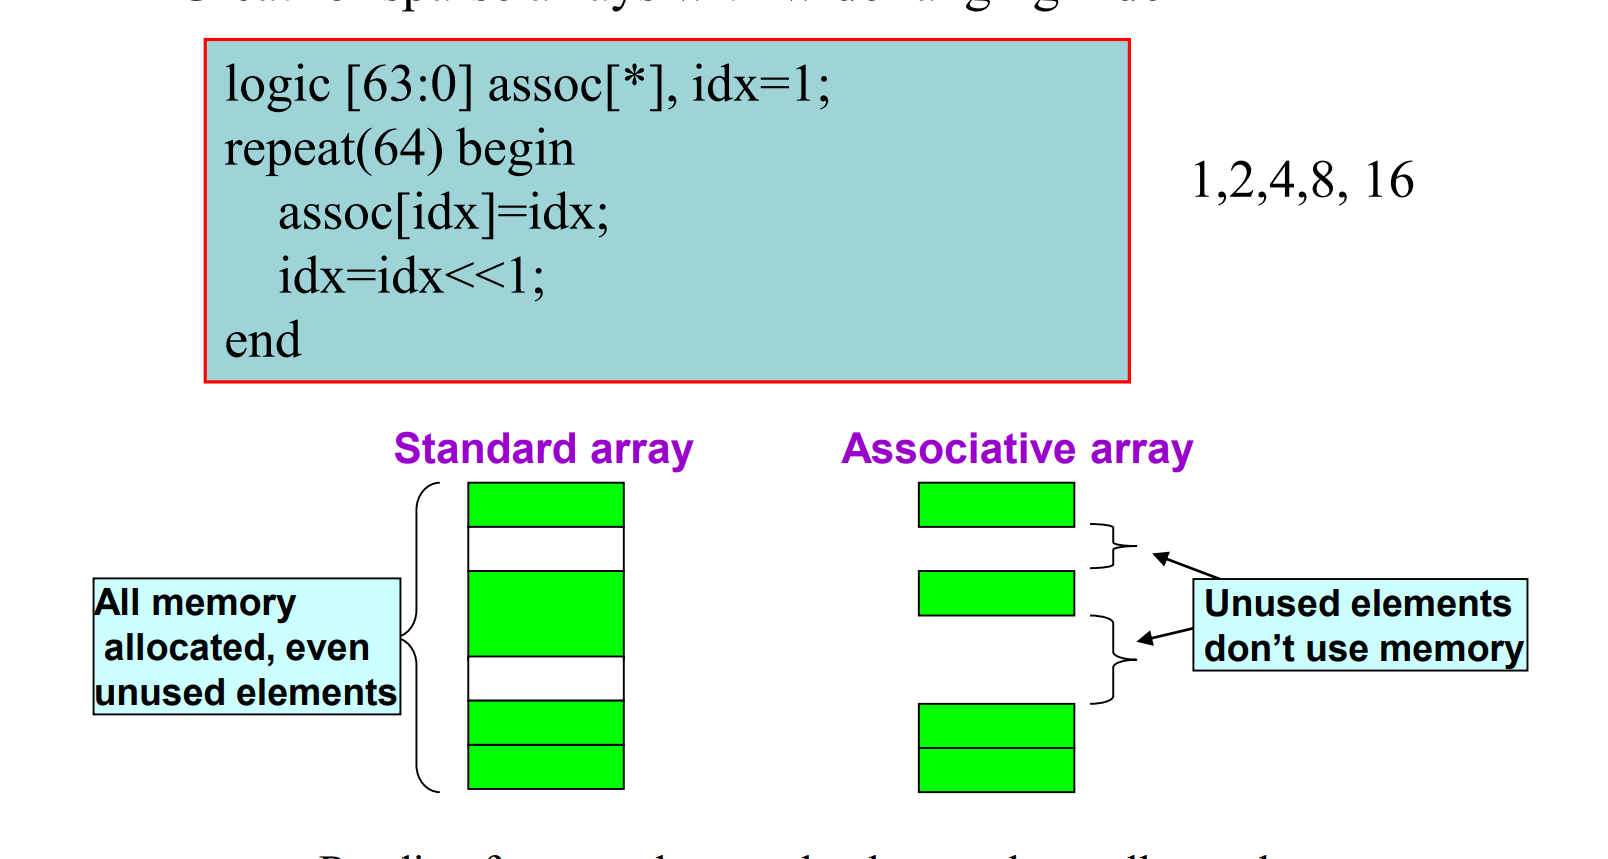
关联数组 Associate Array 语法:
用一个星号进行声明。
与动态数组的比较:
应用场景:
存储稀疏数据:当数据集是非连续的或稀疏的,关联数组是一个理想的选择。
查找表:在需要快速查找的场景下,如实现映射或字典功能。
动态数据处理:在验证环境中,经常需要处理动态变化的数据集,关联数组在这方面非常有用。
Queue 队列 语法:
参考C++的vector.
1
2
3
4
5
6
7
Size() Insert() Delete() Pop_front() Pop_back() Push_front() Push_back()
Array Methods: 1 2 3 4 5 6 7 8 $left $right $low $high $increment $size $dimensions $unpacked_dimensions
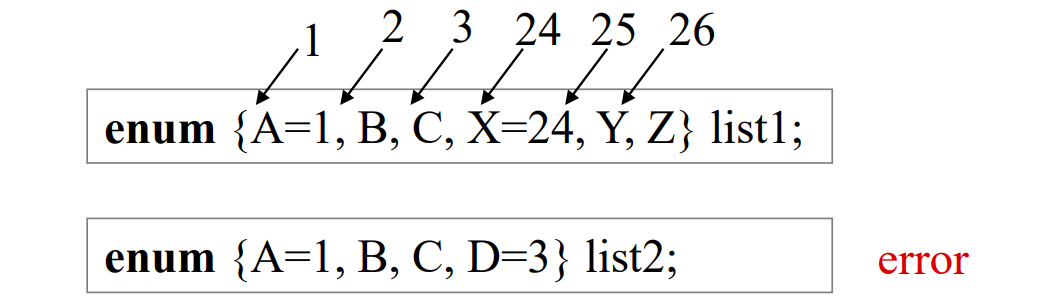
枚举 enumerated 语法:
1 enum {red, green, blue} RGB
枚举类型的特性:枚举中的每个变量是默认自增的,当人为定义各类型的值时,需要注意不能违背自增原则。
结构体 Structure 语法:类似C
1 2 3 4 5 6 struct { int a,b; logic [7 :0 ] opcode; logic [23 :0 ] address; bit error; } Instruction_Word
同时还有一种 packed的定义方式:
1 2 3 4 5 struct packed { logic valid; logic [7 :0 ] tag; logic [31 :0 ] data; } data_word
packed定义的结构体在内存上是连续的。
1 2 data_word.tag = 8 ’hf0; data_word [39 :32 ]=8 ’hf0;
System Verilog Programming Basic I verilog style 一个常见的状态机的写法:
1 2 3 4 5 6 7 8 9 10 11 12 13 14 15 16 17 18 19 20 21 22 23 24 25 26 27 28 29 module fsm1a (ds, rd, go, ws, clk, rst_n);output ds, rd;input go, ws,clk, rst_n;parameter [1 :0 ] IDLE = 2'b00 ,READ = 2'b01 ,DLY =2'b10 ,DONE = 2'b11 ;reg [1 :0 ] state, next;wire rd, ds;always @(posedge clk or negedge rst_n) if (!rst_n) state <= IDLE; else state <= next; always @(state or go or ws) begin case (state) IDLE: if (go) next = READ; else next = IDLE; READ: next = DLY; DLY: if (ws) next = READ; else next = DONE; DONE: next = IDLE; endcase end assign rd = (state==READ || state==DLY);assign ds = (state==DONE);endmodule
SV中对端口的数据类型不做限制
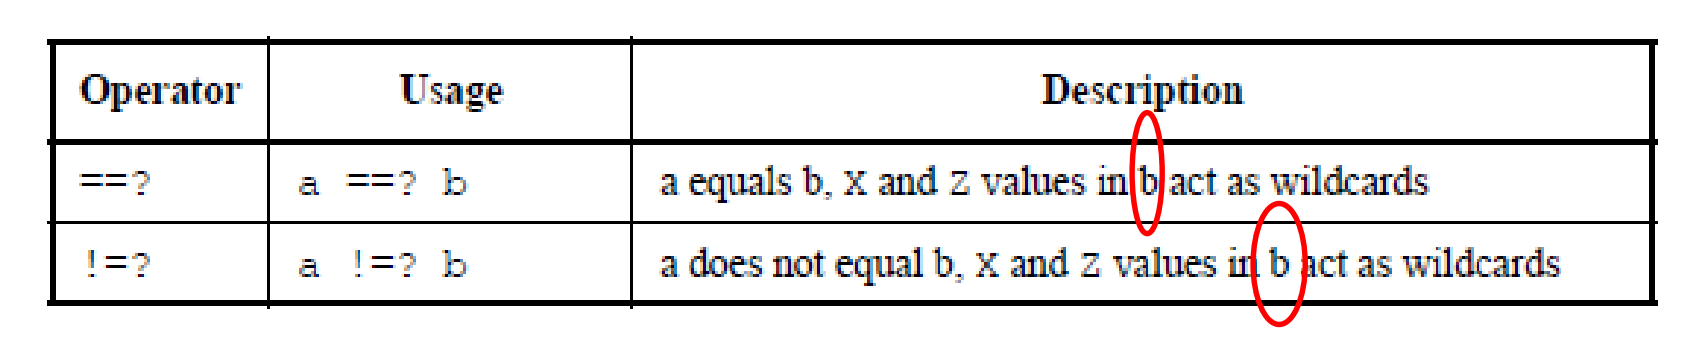
操作符 判断 == !=逻辑判断
=== !==
==? !=?
1 2 3 4 5 6 7 8 9 10 11 12 13 14 15 16 17 18 19 20 21 22 module test_wildcard(); logic [3 :0 ] a, b,c; logic le1,le2,ce1,ce2,we1,we2,we3; initial begin a=4'b010z ; b=4'b0101 ; c=4'b010z ; le1=(a==b); le2=(a==c); $display ("%b,%b" ,le1,le2); ce1=(a===b); ce2=(a===c); $display ("%b,%b" ,ce1,ce2); we1=(a==?b); we2=(b==?a); we3=(a==?c); $display ("%b,%b,%b" ,we1,we2,we3); end endmodule
递增、递减 ++ --
+= -=
注意:+=是一种阻塞赋值。
example:
1 2 3 4 5 6 7 8 9 10 11 12 13 14 15 16 17 18 19 20 21 22 23 module test();int dat0,dat1,dat00,dat01,dat02,dat10,dat11,dat12;bit tik=1'b1 ;bit clk;always #1 clk=!clk;always @(posedge clk)begin dat00 <= dat0 + tik; dat0 = dat0 + tik; dat01 <= dat0 + tik; dat02 <= dat01 + tik; end always @(posedge clk)begin dat10 <= dat1 + tik; dat1 += tik; dat11 <= dat1 + tik; dat12 <= dat11 + tik; end endmodule
即 a+=b和a = a+b的效果完全相同。
example
1 2 3 4 5 6 7 8 9 10 11 12 13 14 15 16 17 18 19 20 21 module test();int dat0,dat1,dat3,dat30,dat31;int tik0,tik1,tik3;initial begin dat0 =tik0++; $display ("dat0=%d,tik0=%d" ,dat0,tik0); dat1=++tik1; $display ("dat1=%d,tik1=%d" ,dat1,tik1); end initial begin dat30<=tik3; dat3 =++tik3; dat31<=tik3; $display ("dat30=%d,dat3=%d,dat31=%d,tik3=%d" , dat30,dat3,dat31,tik3); end
inside 1 2 3 4 5 6 logic [2 :0 ] a;if (a inside {3 ’b001, 3 ’b010, 3 ’b100})logic [2 :0 ] a;if ((a==?3 ’b001)||(a==?3 ’b010)||(a==?3 ’b100))
顾名思义,inside用于检查一个变量是否在一个集合中。
同时, inside 可以用作通配操作:
1 2 3 4 5 wire r;assign r=3'bz11 inside {3'b1 ?1 , 3'b011 }; assign r = (3'bz11 ==?3'b1 ?1 || 3'bz11 ==?3'b011 )
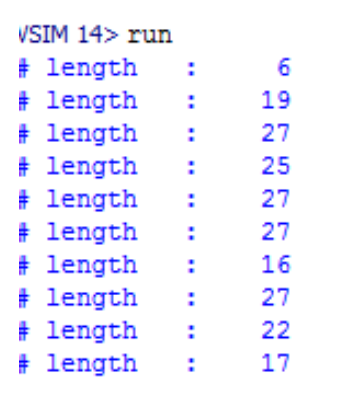
dist 产生某种统计分布
example:
1 2 3 4 5 6 7 8 9 10 11 12 13 14 15 16 17 18 19 20 21 22 23 module distribution (); class frame_t; rand bit [15 :0 ] length; constraint len { length dist { [0 :7 ] := 8 , [8 :15 ] := 8 , [16 :31 ] := 16 };} function void post_randomize(); $display ("length : %d" ,length); endfunction endclass initial begin frame_t frame = new (); integer i,j = 0 ; for (j=0 ;j < 32 ; j++) i = frame.randomize (); end endmodule
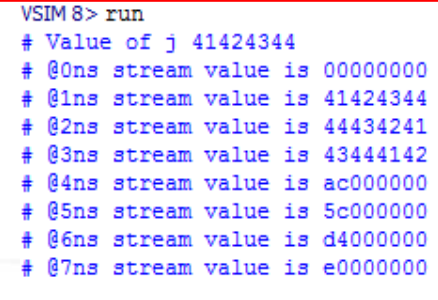
streaming {<<{}} {>>{}}
example:
1 2 3 4 5 6 7 8 9 10 11 12 13 14 15 16 module streaming();int j = { "A" , "B" , "C" , "D" };bit [31 :0 ] stream;initial begin $display ("Value of j %0x" ,j); $monitor ("@%0dns stream value is %x" ,$time , stream); #1 stream = { >> {j}}; #1 stream = { << byte {j}}; #1 stream = { << 16 {j}}; #1 stream = { << { 8'b0011_0101 }}; #1 stream = { << 4 { 6'b11_0101 }}; #1 stream = { >> 4 { 6'b11_0101 }}; #1 stream = { << 2 { { << { 4'b1101 }} }}; end endmodule
casting 固定(强制类型转换) 具体操作:
type’ (expression)
1 2 3 longint a,y;real r;y=a+longint ’(r**3 )
宽度、符号位等也可以进行固定。
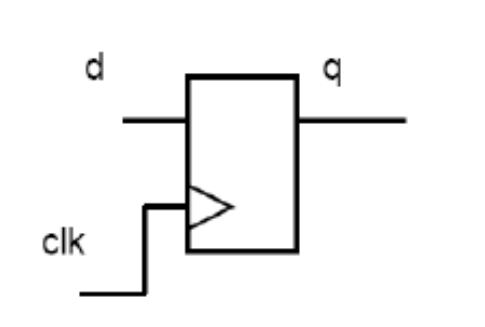
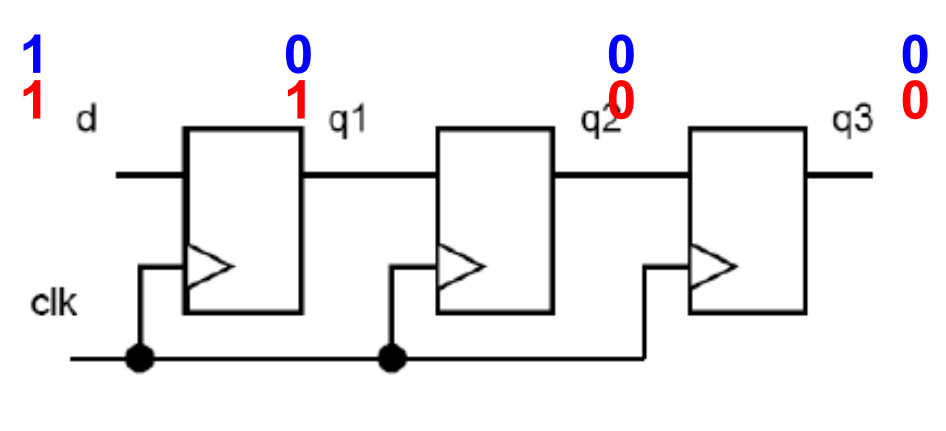
Assignment 赋值 阻塞赋值、非阻塞赋值
不同的电路描述方式会产生不同的电路:
1 2 3 4 5 6 7 8 9 10 11 12 13 14 module pipeline1(clk,d,q); input clk,d; output q; reg q1,q2,q3; wire clk,d,q; always @(posedge clk)begin q1=d; q2=q1; q3=q2; end assign q=q3; endmodule
对应的电路:
1 2 3 4 5 6 7 8 9 10 11 12 13 module pipeline1(clk,d,q); input clk,d; output q; reg q1,q2,q3; wire clk,d,q; always @(posedge clk)begin q1<=d; q2<=q1; q3<=q2; end assign q=q3; endmodule
分支 if else
注意if else要讨论清楚所有情况。
case
casez
casex
当多个分支同时满足条件时,case只选择第一个分支。(即case存在优先级)
unique 和 priority用在分支语句之前
unique 会对分支条件有重叠(overlap)或分支不全的情况进行报警。unique 用于 if-else 或 case 语句,以指示只有一个条件或分支应该为真。如果多个条件或分支同时为真,这通常被视为编码错误,可能会在仿真时产生警告或错误。
priority 确保了条件或分支的评估顺序,即使有多个条件或分支为真,也只有第一个为真的会被执行。
举例:
1 2 3 4 5 6 7 8 9 10 11 12 13 module unique_if;int a,b,c;initial begin a=10 ; b=20 ; c=40 ; unique if ( a < b ) $display ("\t a is less than b" ); else if ( a < c ) $display ("\t a is less than c" ); else $display ("\t a is greater than b and c" ); end endmodule
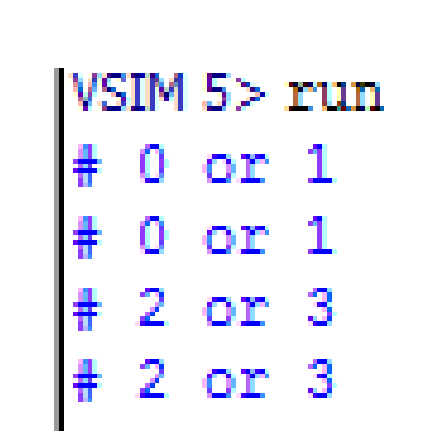
1 2 3 4 5 6 7 8 9 10 11 module test_priority();initial begin for (int a = 0 ;a<4 ;a++) priority casez (a) cause a warning 3'b00 ?: $display ("0 or 1" ); 3'b0 ??: $display ("2 or 3" ); endcase end endmodule
过程块 procedural statements initial
final final中不能定义延迟。
example:
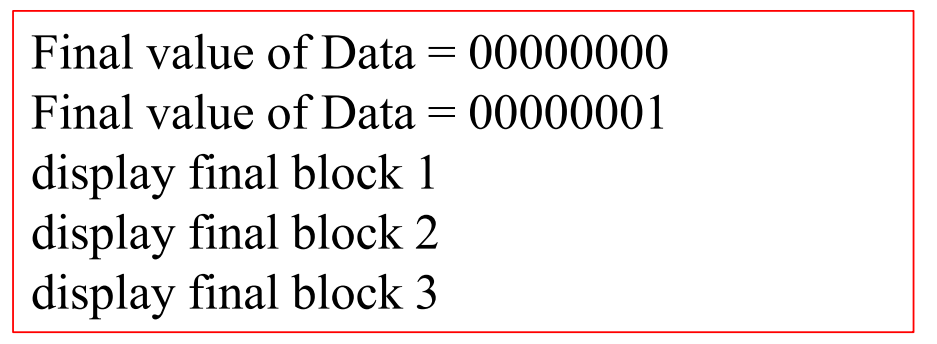
1 2 3 4 5 6 7 8 9 final begin $display (“Final value of Data = %h ", data); data = 1; // even assignments can be done $display (" Final value of Data = %h ", data); end final $display (" display final block 1 "); final $display (" display final block 2 "); final $display (" display final block 3 ");
区别在于,final中不能添加任何delay语句(#delay)
always
sv 新增:always_ff/always_comb/always_latch
SV将组合逻辑、时序逻辑和latch严格区分。
数字设计时,需要避免latch和组合逻辑环。
Loop 循环 forever
1 2 3 4 5 6 7 8 9 initial begin clock1 <= 0 ; clock2 <= 0 ; fork forever #10 clock1 = ~clock1; #5 forever #10 clock2 = ~clock2; join end
for 循环 :
1 2 3 4 5 always @(posedge clock) begin for (int i=1 ; i<=1024 ; i=i+1 )… end endmodule
sv和verilog的区别在于,sv可以运行循环控制变量i在循环内部定义(接近c语言的风格)
foreach
1 2 3 4 5 6 string words [2 ] = '{ "hello" , "world" }; int prod [1 :8 ] [1 :3 ]; foreach ( words [ j ] ) $display ( j , words[j] ); foreach ( prod[ k, m ] ) prod[k][m] = k * m;
很灵活,可以直接用索引代指变量
while/do while
break
repeat
functions and tasks(SV的重点) task:执行需要时间
function: 被看作瞬时完成,不能有延时操作。
task可以调用function,task不能调用function
function只能有1个返回值,task可以通过output产生多个返回值。task不能写return.
1 2 3 4 5 6 7 8 9 10 11 12 13 14 15 16 module foo(loo); input [7 :0 ] loo; wire [7 :0 ] goo = zero_count(loo); function [3 :0 ] zero_count; input [7 :0 ] in_bus; integer i; begin zero_count = 0 ; for (i=0 ; i<8 ; i= i+1 ) if (!in_bus[i]) zero_count = zero_count +1 ; end endfunction endmodule
1 2 3 function int add_and_inc (input [31 :0 ] a,b); add_and_inc=a+b+1 ; endfunction
1 2 3 4 5 6 7 8 function void add ( byte a , b ); val = a + b ; endfunction always @(posedge clk) begin add (2 ,3 ); $display (val); end
函数值被看作默认的返回值。
变量的静态和动态(static/automatic) 动态:局部的变量
task 和 function默认是静态的。
SV 的参数传递 1.传值
1 2 3 function int add (byte a , b );return a + b ;endfunction
2.传引用
在变量名前面加上关键字ref
1 2 3 4 5 6 7 8 9 10 11 12 13 14 15 module argument_passing1;int x,y,z;function automatic int sum(ref int x,y); x = x+y; return x+y; endfunction initial begin x = 20 ; y = 30 ; z = sum(x,y); $display ("\tValue of x = %0d" ,x); $display ("\tValue of y = %0d" ,y); $display ("\tValue of z = %0d" ,z); end endmodule
3.默认参数
例:
1 2 3 4 5 task add ( int a =1 ; int b; int c=3 );… … add ( ,2 , ); add ( 4 ,2 , ); add ( );
quiz
Why a function cannot call a task?
• Because of the timing delays allowed in task; Non-Zero time !
Tasks not synthesizable ?
A function should return a value?
Why a task cannot return a value?
Why a function cannot have delays?
Why disable statements are not allowed in functions?
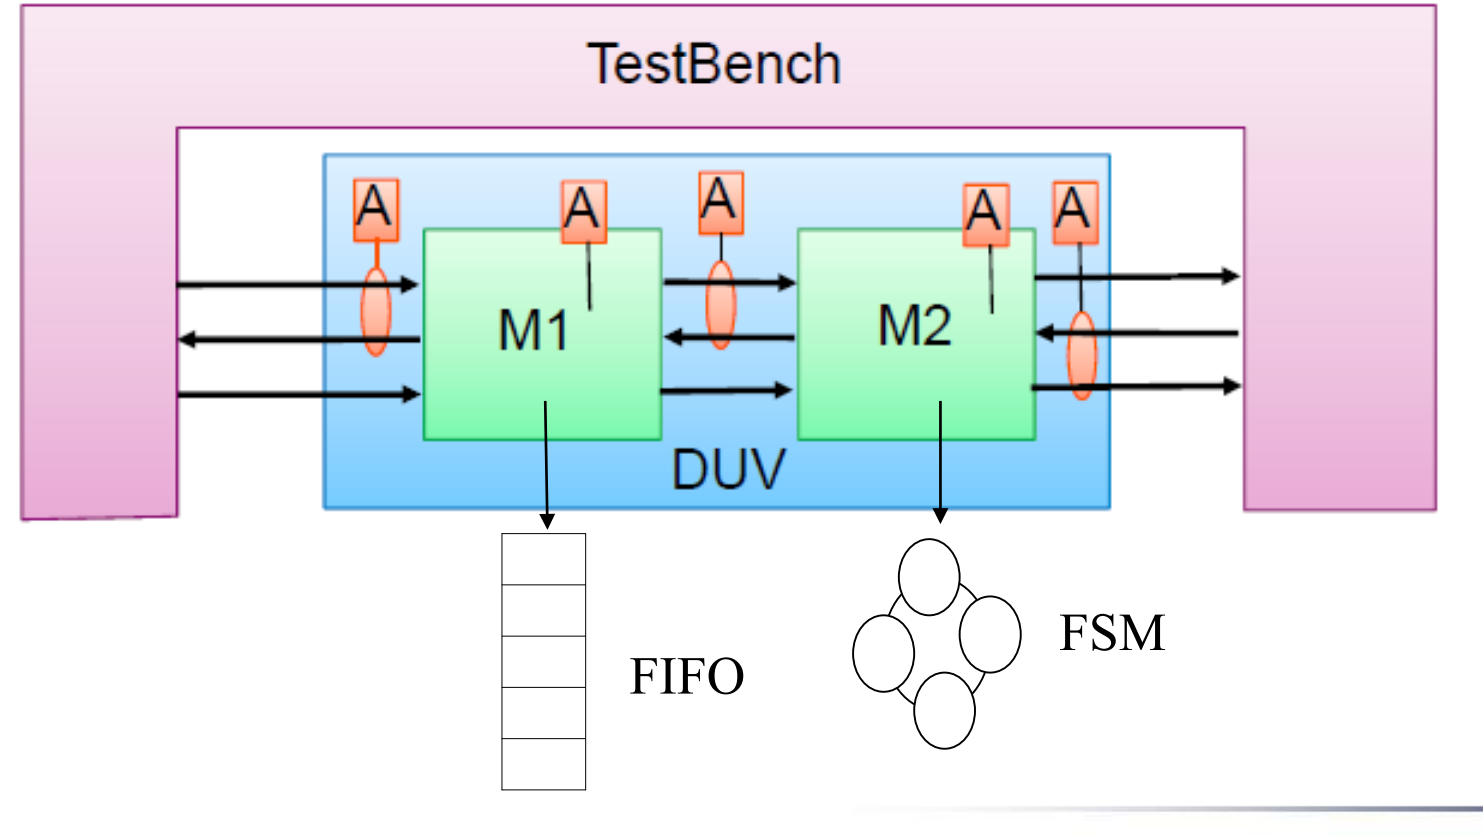
System Verilog Programming Basic II Interface 主要用途:用作端口通信。可以在其中实现一些比较复杂的通信协议。
driver:驱动端,负责数据的产生
传统方法:
1 2 3 4 5 6 7 8 9 10 11 12 13 14 15 16 17 18 19 20 21 22 23 24 25 module arb_port ( output logic [1 :0 ] grant, input logic [1 :0 ] request, input logic reset, input logic clk ); … endmodule module test ( input logic [1 :0 ] grant, output logic [1 :0 ] request, output logic reset, input logic clk ); … endmodule module top logic [1 :0 ] grant,request; logic clk, reset; arb_port a1(.grant (grant), .request (request), .reset (reset), .clk (clk)); test t1(.grant (grant), .request (request), .reset (reset), .clk (clk)); … endmodule
使用interface: 1 2 3 4 5 6 7 8 9 10 11 12 13 14 15 16 17 18 19 20 21 22 23 24 25 26 27 28 29 interface simple_bus; logic req,gnt,start,rdy ; logic [1 :0 ] mode; logic [7 :0 ] addr,data; endinterface module mem_mod ( input bit clk,simple_bus busa); logic sel_mem = 1 ; always @(posedge clk) begin busa.gnt <= busa.req & sel_mem; end endmodule module cpu_mod ( input bit clk,simple_bus busa); logic sel_cpu; always @(posedge clk) begin busa.mode <= {busa.gnt , busa.gnt }; busa.req <= 1 ; end endmodule module top_mod1; logic clk = 0 ; simple_bus sb( ); always #5 clk = ~clk; cpu_mod1 cpu (clk, sb); mem_mod1 mem (clk, sb); endmodule
Interface 可以包含端口。 Modport:对Interface的端口方向进行限制 modport 同时还可以对信号进行分组。
1 2 3 4 5 6 7 8 9 10 11 12 13 14 15 16 17 18 19 20 21 22 interface simple_bus (input bit clk) ;logic req, gnt, start, rdy ; logic [1 :0 ] mode;logic [7 :0 ] addr; logic [16 :0 ] data;modport master ( input ,req,gnt,clk,mode,addr,output data, start,rdy); modport slave (output req,gnt,mode,addr,input data, start, rdy);endinterface module mem (simple_bus mbus);endmodule module cpu (simple_bus sbus);endmodule module top; simple_bus busa(); mem mem_i (.mbus (busa.master )); cpu cpu_i (.sbus (busa.slave )); endmodule
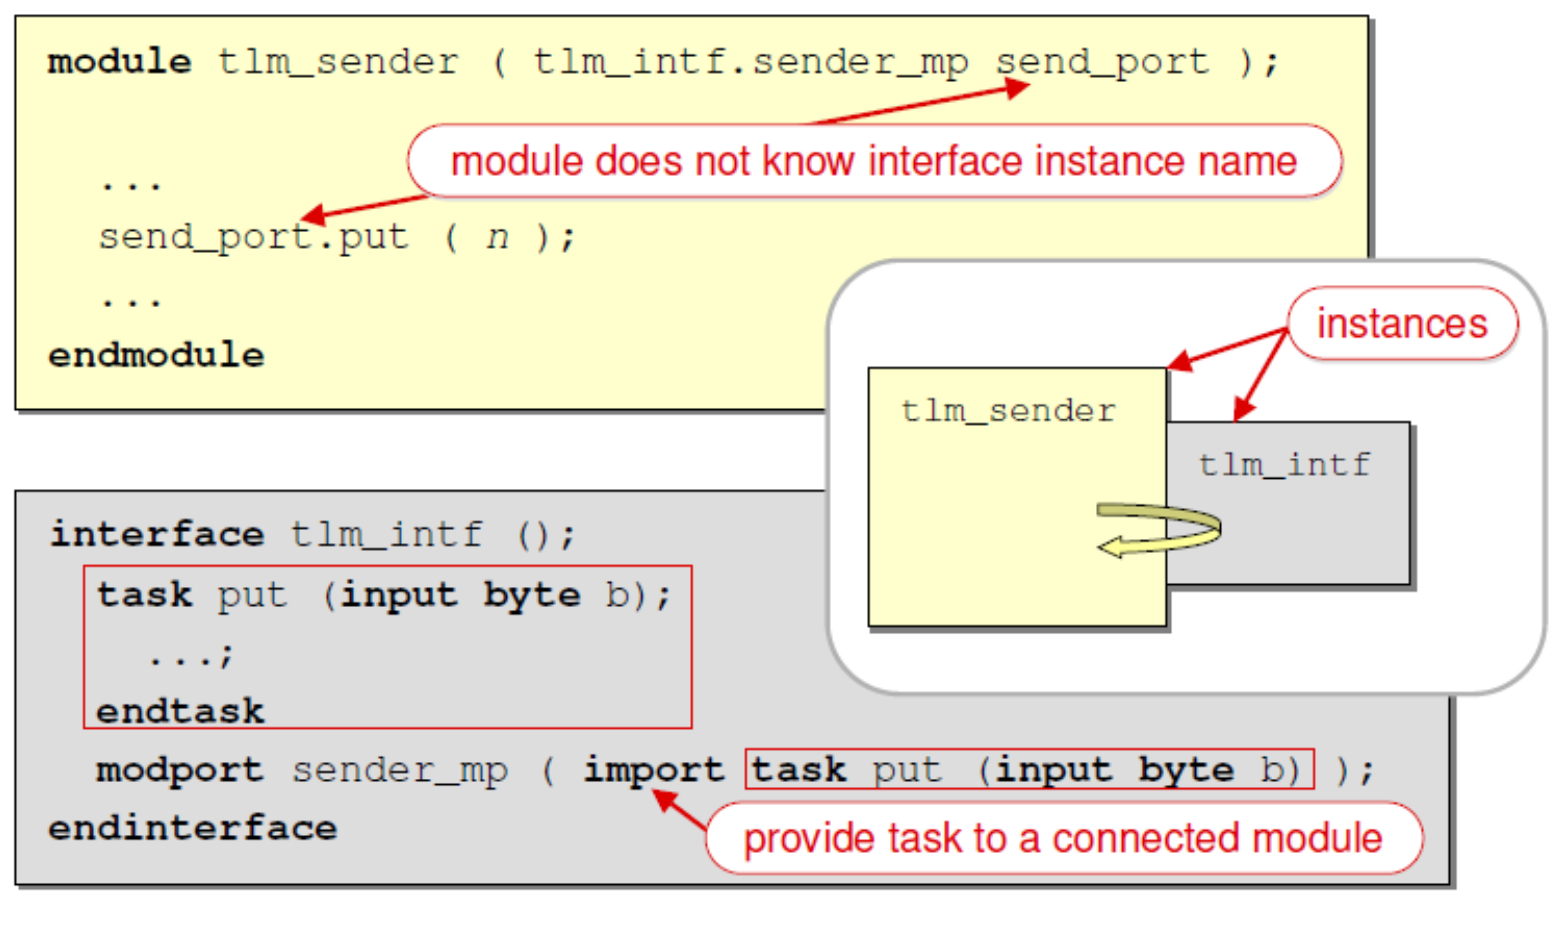
Interface中可以申明或调用task 和 function 使用import,export来调用task。
区分:
example:
1 2 3 4 5 6 7 8 9 10 11 12 13 14 15 16 17 18 19 20 21 22 23 24 module tlm_sender (tlm_intf.sender_mp send_port); initial send_port.put ("n" ); endmodule module tlm_receiver (tlm_intf.receiver_mp receive_port); task receive_port.put (input byte b); $display ("i got data =%0d" ,b); endtask endmodule module test;interface tlm_intf(); modport sender_mp(import task put(input byte b)); modport receiver_mp(export task put(input byte b)); endinterface tlm_intf tlm_int0(); tlm_sender tlm_sender0(tlm_int0.sender_mp ); tlm_receiver tlm_receiver0(tlm_int0.receiver_mp ); endmodule
带参数的Interface Interface中可包含参数,用法和module中的参数一样。
1 2 3 4 5 interface simple_bus #(dwidth =32, awidth = 8) ( input bit clk ) ; logic req,gnt,start,rdy ; logic [dwidth :0 ] data; logic [awidth:0 ] addr; endinterface
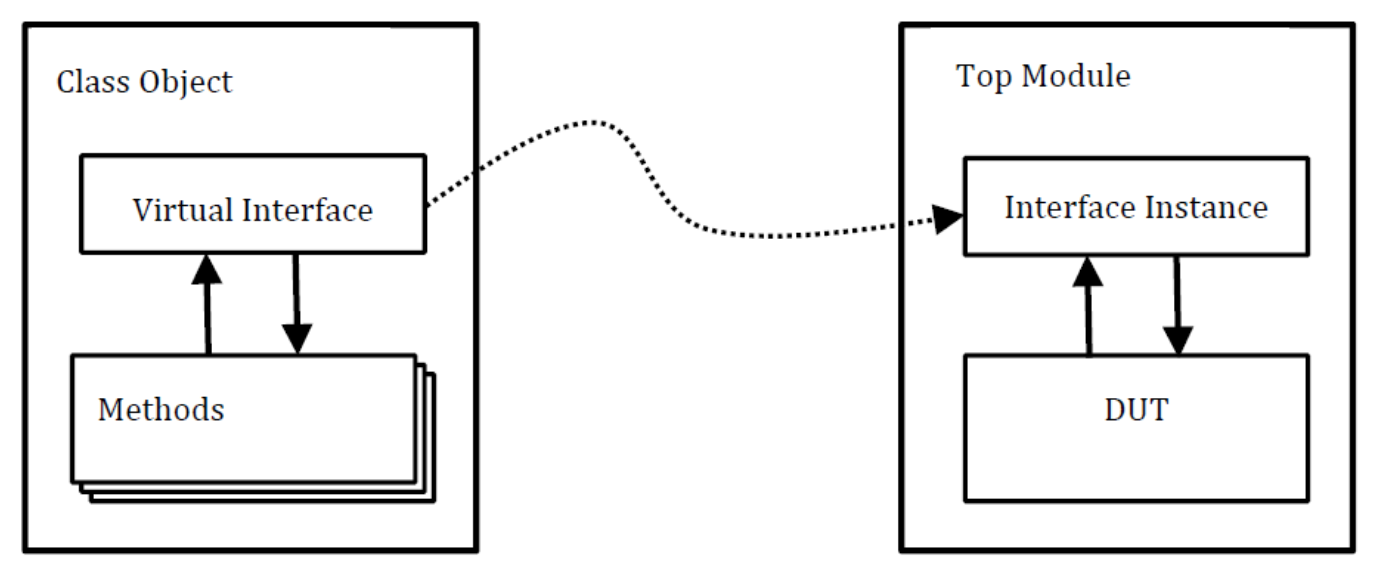
Virtual Interface Interface作为一个特殊的类,无法在其他类的定义中进行例化。当在一个类中使用interface时,该interface必须被申明为virtual。
用法举例:
1 2 3 4 5 6 7 8 9 10 11 12 13 14 15 16 17 18 19 20 21 22 23 24 25 26 27 28 29 30 31 32 33 34 35 36 37 38 39 40 41 42 43 44 45 46 47 48 49 50 51 52 53 54 55 56 57 58 59 60 61 62 63 64 65 66 67 68 69 70 71 72 73 74 75 76 77 78 79 80 81 82 83 84 85 86 87 88 89 90 91 92 93 94 95 96 97 98 99 interface my_if(input clk, input rst_n); logic [7 :0 ] data; logic valid; endinterface class my_driver extends uvm_driver; virtual my_if vif; `uvm_component_utils(my_driver) function new (string name = "my_driver" , uvm_component parent = null ); super .new (name, parent); `uvm_info("my_driver" , "new is called" , UVM_LOW); endfunction virtual function void build_phase(uvm_phase phase); super .build_phase (phase); `uvm_info("my_driver" , "build_phase is called" , UVM_LOW); if (!uvm_config_db#(virtual my_if)::get(this, "", "vif", vif)) `uvm_fatal("my_driver" , "virtual interface must be set for vif!!!" ) endfunction extern virtual task main_phase(uvm_phase phase); endclass task my_driver::main_phase(uvm_phase phase); phase.raise_objection (this ); `uvm_info("my_driver" , "main_phase is called" , UVM_LOW); vif.data <= 8'b0 ; vif.valid <= 1'b0 ; while (!vif.rst_n ) @(posedge vif.clk ); for (int i = 0 ; i < 256 ; i++)begin @(posedge vif.clk ); vif.data <= $urandom_range(0 , 255 ); vif.valid <= 1'b1 ; `uvm_info("my_driver" , "data is drived" , UVM_LOW); end @(posedge vif.clk ); vif.valid <= 1'b0 ; phase.drop_objection (this ); endtask `timescale 1ns/1ps `include "uvm_macros.svh" import uvm_pkg::*;`include "my_if.sv" `include "my_driver.sv" module top_tb;reg clk;reg rst_n;reg [7 :0 ] rxd;reg rx_dv;wire [7 :0 ] txd;wire tx_en;my_if input_if(clk, rst_n); my_if output_if(clk, rst_n); dut my_dut(.clk (clk), .rst_n (rst_n), .rxd (input_if.data ), .rx_dv (input_if.valid ), .txd (output_if.data ), .tx_en (output_if.valid )); initial begin clk = 0 ; forever begin #100 clk = ~clk; end end initial begin rst_n = 1'b0 ; #1000 ; rst_n = 1'b1 ; end initial begin run_test("my_driver" ); end initial begin uvm_config_db#(virtual my_if)::set(null, "uvm_test_top", "vif", input_if) ; end endmodule
Program 在设计中,顶层模块是一个module,在验证中,为了构建某种仿真环境,设计出program。program的目的是将testbench与DUT独立开来。
example:
1 2 3 4 program test (input clk, input [16 :1 ] addr, inout [7 :0 ] data); initial ... endprogram
program与module的关系:
program中不需要always块,例化module,申明interface,或申明其他program。只有initial和methods是允许的。
Package 目的:通过Package在不同module之间来共享代码。
example:
1 2 3 4 5 6 7 8 9 10 11 12 13 14 15 package pack; integer global_counter ; task incr ; … … endtask endpackage : packmodule mod1; import pack::* ; initial begin global_counter = 567 ; incr(); declared end endmodule : mod1
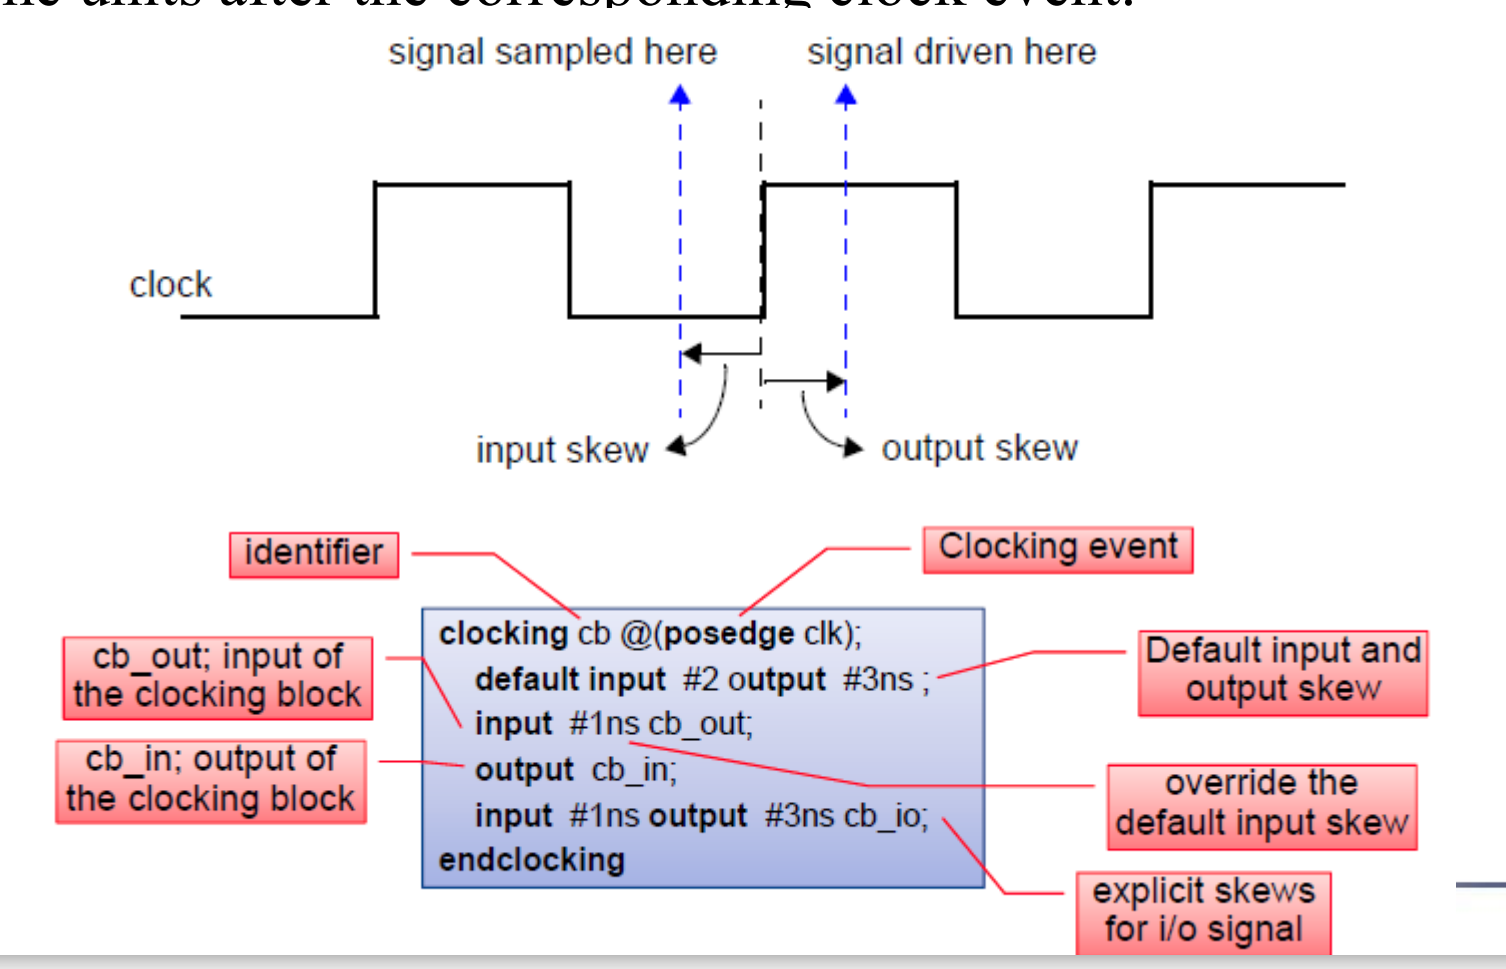
Clocking block 目的:调整数据和时钟的关系,使其满足建立时间和保持时间
1 2 3 4 5 6 7 clocking cb1 @(posedge clk); default input #10 ns output #2 ns ; output data; output sel; endclocking
1 2 3 4 5 6 7 8 9 10 11 12 13 14 15 16 17 18 19 20 21 22 23 24 module top;logic [2 :0 ] a0,a2, a3, a4; bit [1 :0 ] a1;logic clk;initial begin clk=0 ; for ( int i =0 ;i<20 ;i++) clk = #5 ~clk; end initial for ( int i =0 ;i<20 ;i++) a1 = #2 ~a1;clocking cb @(posedge clk);default input #2 output #3 ;input #2 a1;output a0,a2 , a3 ;output negedge a4;endclocking always begin @(cb); cb.a2 <= 3'b11 ; cb.a4 <= 3'b10 ; cb.a3 <= a1; cb.a0 <= cb.a1 ; end endmodule
Race Two expressions scheduled to execute at same time, if order
使用串行仿真器处理并行语言时遇到的困境。
想要避免race,需要理解仿真器对不同操作的调度顺序
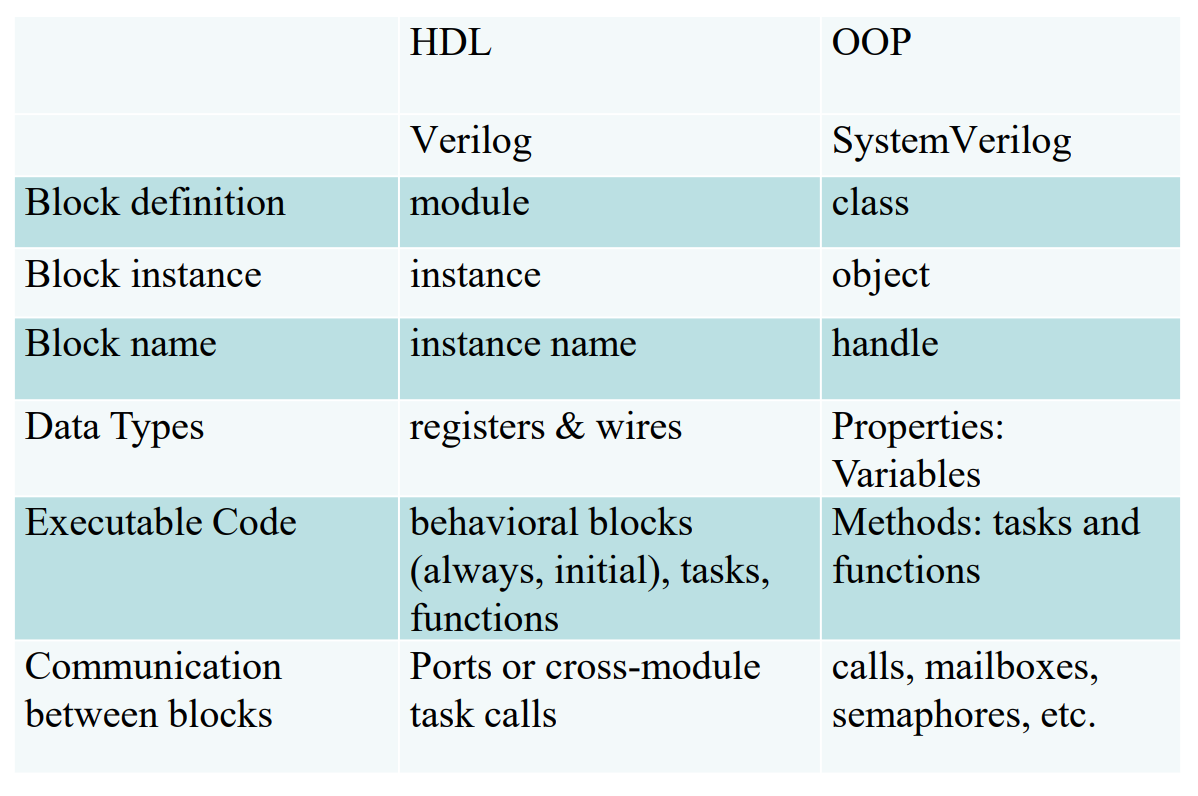
LEC 8 面向对象设计 为什么采用面向对象来构建testbench?
1.用于集成一些不同的数据类型。
类与对象 类:包含一组数据类型和对应的操作方法(task和function)
类在定义时不占用内存。当对应的对象被例化时才占用。
HDL与OOP的比较:
一个class的例子: 1 2 3 4 5 6 7 8 9 10 11 12 13 14 15 16 17 18 19 20 21 22 class Packet ; bit [3 :0 ] command; integer time_requested; typedef enum { ERR_OVERFLOW= 10 , ERR_UNDERFLOW = 1123 } PCKT_TYPE; const integer buffer_size = 100 ; function new (); command = 4'd0 ; endfunction task clean(); command = 0 ; endtask task issue_request( int delay ); endtask function integer current_status(); current_status = status; endfunction endclass
null类型 未被初始化的类型默认为null值(类似C++)
对象名被看作是对所分配内存的指针(或句柄(handle))
1 2 3 4 5 6 7 8 9 10 11 12 13 14 15 16 17 class BusTran; bit [31 :0 ] addr, crc, data[8 ]; function calc_crc; calc_crc=addr^data; endfuntion: calc_crc function void display; $display (“BusTran: %h”, addr); endfunction : display endclass : BusTranBusTran b1,b2; b1= new (); b2=b1; b1 = new (); b1.addr =32 ’h42; b1.display (); b2 = null ;
class 中的方法只有function 和task
构造函数 1 2 3 4 5 6 class Packet;integer command;function new (); command = IDLE; endfunction endclass
内建的构造函数命名为new。
1 2 3 4 5 6 7 8 9 10 11 12 13 14 15 16 17 class my_class; integer count ; function new (); count = 5 ; endfunction endclass my_class c1 = new ; class my_class; integer count ; function new (input int temp); count = temp ; endfunction endclass my_class c1 = new (44 ) ;
区分new()和new[]:
静态变量 用途:在不同对象之间建立联系。相当于class中的公共空间。
1 2 3 4 5 6 7 8 9 10 11 12 13 14 class Transaction; static int count = 0 ; int id; function new (); id = count++; endfunction endclass Transaction b1,b2; initial begin b1=new ; b2=new ; $display (b2.id , b2.count ); end
也可以定义 static的方法:
1 2 3 4 5 6 class id; static int current = 0 ; static function int next_id(); next_id = ++current; endfunction endclass
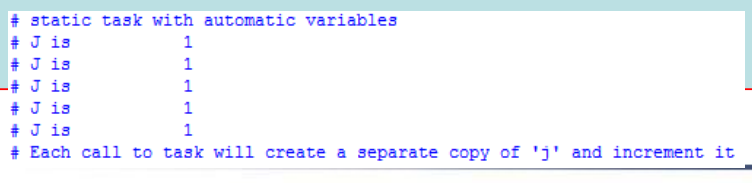
对static方法的每次调用都会独立的执行一次该方法。example:
static 方法中的变量仍然是动态的。
1 2 3 4 5 6 7 8 9 10 11 12 13 14 15 16 17 18 19 20 21 22 23 24 25 26 class A ; static task incr(); int j; j++; $display ("J is %d" ,j); endtask endclass program main ; A obj_1; A obj_2; initial begin $display ("static task with automatic variables" ); obj_1 = new (); obj_2 = new (); obj_1.incr (); obj_2.incr (); obj_1.incr (); obj_2.incr (); A::incr(); $display ("Each call to task will create a separate copy of 'j' and increment it" ); end endprogram
result:
this 内建语句,用于表示当前的对象。
继承 使用关键词 extends
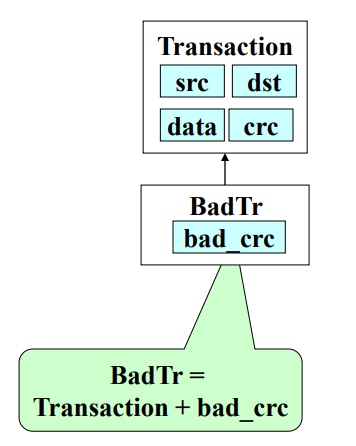
1 2 3 4 5 6 7 8 9 10 11 12 13 class Transaction; bit [31 :0 ] src, dst, data bit [1024 ], crc; endclass class BadTr extends Transaction; bit bad_crc; endclass BadTr bt; bt = new ; bt.src = 42 ; bt.bad_crc = 1 ;
继承使得一个类可以在父类的基础特性上增加新的特性。
使用关键词super调用父类的方法。
1 2 3 4 5 6 7 8 9 10 11 12 13 14 class Transaction; bit [31 :0 ] src, dst, data[1024 ], crc; function void calc_crc(); crc = src ^ dst ^ data.xor ; endfunction endclass class BadTr extends Transaction; rand bit bad_crc; function void calc_crc(); super .calc_crc (); if (bad_crc) crc = ~crc; endfunction endclass
虚函数和虚方法(virtual) 用途:用于构建模板,只有被继承时才可以例化。
虚函数在被重构后产生多态,不同继承对象调用同一函数时,产生不同的效果。
使用虚函数的好处
灵活性:允许在运行时根据对象的实际类型调用正确的方法。
可扩展性:可以在不修改现有代码的情况下,通过添加新的派生类来扩展功能。
封装:允许派生类修改或扩展基类的行为,而不影响使用基类引用的代码。
1 2 3 4 5 6 7 8 9 10 11 12 13 14 15 16 17 18 19 20 21 22 23 24 25 26 27 28 29 30 31 32 33 34 35 36 37 38 39 40 41 42 43 44 class BasePacket; int A = 1 ; int B = 2 ; function void printA; $display ("BasePacket::A is %d" , A); endfunction : printA virtual function void printB; $display ("BasePacket::B is %d" , B); endfunction : printB endclass : BasePacketclass My_Packet extends BasePacket; int A = 3 ; int B = 4 ; function void printA; $display ("My_Packet::A is %d" , A); endfunction : printA virtual function void printB; $display ("My_Packet::B is %d" , B); endfunction : printB endclass : My_PacketProgram test_virtual_method() BasePacket P1 = new ; My_Packet P2 = new ; initial begin P1.printA ; P1.printB ; P1 = P2; P1.printA ; P1.printB ; P2.printA ; P2.printB ; end endprogram
理解:虚函数运行多态,当基类被upcasting给派生类后,可以调用派生类的方法。相反,如果不是虚函数,则还是调用原来自己有的方法。
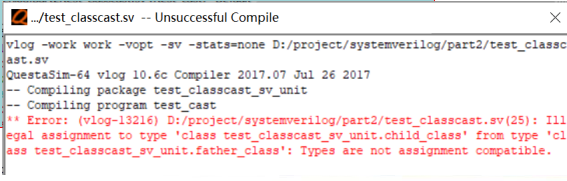
cast upcasting: 将子类的对象赋值给父类
downcasting: 不合法的操作。子类被看作是独立于父类的对象。
1 2 3 4 5 6 7 8 9 10 11 12 13 14 15 16 17 18 19 20 21 22 23 24 25 26 27 28 29 class father_class; bit [31 :0 ] fsrc=3 ; function void display(input string prefix="f* " ); $display ("%sfather_class:fsrc=%d" ,prefix,fsrc); endfunction endclass class child_class extends father_class; bit csrc=4 ; function void display(input string prefix="c* " ); $display ("%schild_class:csrc=%b" ,prefix,csrc); super .display (prefix); endfunction endclass program test_cast(); father_class fhandler; child_class chandler; initial begin chandler=new (); fhandler=chandler; $display (fhandler.fsrc ); fhandler.display ; end endprogram
1 2 3 4 5 6 7 8 9 10 11 12 13 14 program test_cast(); father_class fhandler; child_class chandler; initial begin fhandler =new (); Chandler= fhandler; $display (fhandler.fsrc ); fhandler.display ; end endprogram
产生编译错误:
LEC9 跨进程同步与通信 线程的概念 与进程类似,不同之处在于线程是进程的一个更小单位。线程共享内存资源。
SV中的过程: 一个过程块中的代码可以被独立看作一个线程。
initial
begin … end 两种赋值方式:阻塞赋值和非阻塞赋值。非阻塞赋值可以看作是并行的。
fork join example:1 2 3 4 5 6 7 8 9 10 11 12 module inline_ tb; reg [7 : 0 ] data_ bus; initial fork data_bus = 8'b00 ; #10 data_bus = 8'h45 ; #20 repeat (10 ) #10 data_bus = data_bus + 1 ; #25 repeat (5 ) #20 data_bus = data_bus << 1 ; #140 data_bus = 8'h0f ; join endmodule
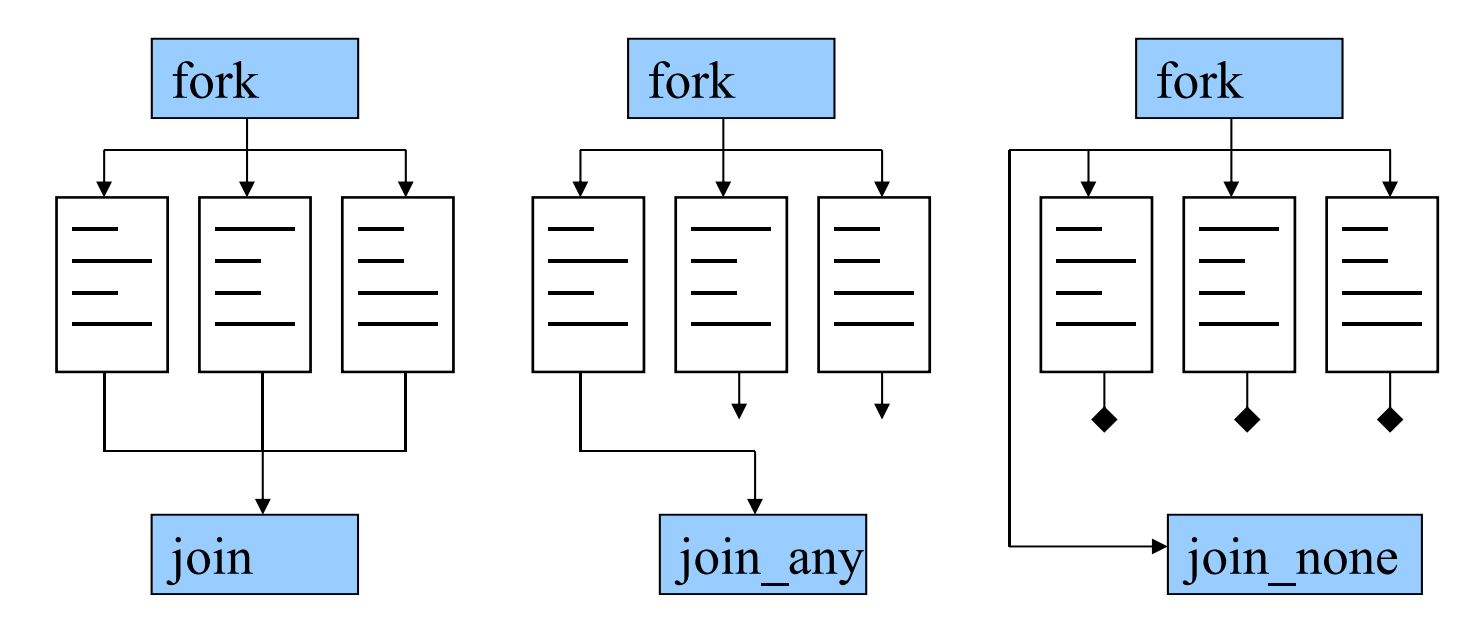
SV中新增的特性:
join_any:父进程阻塞,直到fork中的任意一个线程结束(exit(0));
join_none:父进程不管子进程是否结束,继续执行。
如:
1 2 3 4 5 6 7 8 9 10 11 12 13 14 15 16 17 program test_fork_joinnone;int i,j; initial begin fork begin $display ("First Block \n" ); # 20 ns; end begin $display ("Second Block \n" ); # 30 ns; end join_none $display ("continue main process" ); end endprogram
使用fork join创建多线程时,需要注意变量的值的变化:
1 2 3 4 5 6 7 8 9 10 11 12 program test_join_none_var;int j; initial begin for (int j=0 ;j< 3 ;j++ ) fork automatic int k=j; $display (k); join_none #0 $display ("finish_forjoin" ); end endprogram
1 2 3 4 5 6 7 8 9 10 11 12 13 program test_join_none_var; int k,j; initial begin for (int j=0 ;j< 3 ;j++ ) begin k=j; fork $display (k); join_none end #0 $display ("finish_forjoin" ); end endprogram
辨析:任务或函数被声明为 automatic 时,每次调用都会在堆栈上创建新的存储空间。这意味着每个调用都有自己的局部变量副本,这些变量在调用之间是独立的。这种行为对于递归调用和在并发进程中调用任务或函数非常重要,因为它防止了不同调用之间的数据冲突。
SV中,线程是被动态构造出来的。
进程控制 wait: 事件触发。 使用wait fork 确保所有的子进程都被执行完毕:
1 2 3 4 5 6 7 8 9 10 11 12 13 task do_test; fork exec1(); exec2(); join_any fork exec3(); exec4(); join_none wait fork ; endtask
wait_order() :指定事件的发生顺序。
disable 使用disable结束特定的线程。
EVENTS 语法 event被看作是一种数据类型 ,但其本身没有数据值,仅用作同步信号。可以用作进程或线程之间通信的手段。一个进程可以等待(wait) 一个事件,而另一个进程可以触发(trigger) 这个事件。
@操作符用于等待 某个事件发生,当使用@操作符后的进程被阻塞,直到相应的event被触发。
->和->>用于触发事件,其区别在于前者是阻塞的,后者是非阻塞的。-> 触发事件时,事件会立即被触发。这意味着在当前时间点,所有等待该事件的进程都会被唤醒。->> 时,事件的触发会被安排在当前时间点之后的最近的未来时间点。这是一种非阻塞触发,它允许当前进程继续执行,而不是立即切换到等待该事件的进程。
需要注意的是,某个事件的触发必须在等待之后,而不是之前。否则对应的进程无法被调度。
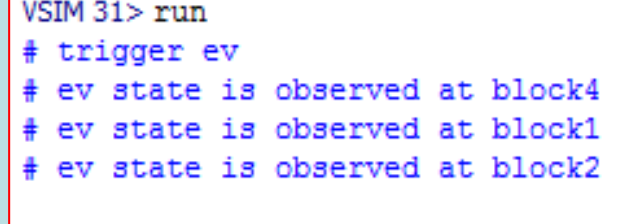
example: 1 2 3 4 5 6 7 8 9 10 11 12 13 14 15 16 17 18 19 20 21 22 23 24 25 26 program p_event;event ev; initial fork begin wait (ev.triggered ) $display ("ev state is observed at block1" ); end begin @(ev) $display ("ev state is observed at block2" ); end begin ->ev; $display ("trigger ev" ); end begin @(ev) $display ("ev state is observed at block3" ); end begin wait (ev.triggered ) $display ("ev state is observed at block4" ); end join endprogram
理解 block2触发但是1没触发。说明@的机制是串行的,虽然写在fork中,但是并不能真的并行。实际上,同一个fork制造的并行语句@(ev)和->ev;构成了一种竞争(race),同一个时刻内事件到底是先触发还是先观测,构成了一种冲突 。
在 SystemVerilog 或任何并发编程环境中,”race condition”(竞争条件)是指两个或多个进程(或线程)在访问共享资源时,最终结果依赖于进程执行的精确时序或顺序。当进程以不可预测的方式相互干扰时,就会发生竞争条件,这可能导致不一致或错误的行为。
例如:
1 2 3 4 5 6 7 8 9 10 11 12 int shared_var;initial begin shared_var = shared_var + 1 ; end initial begin shared_var = shared_var + 2 ; end
在这个例子中,最终 shared_var 的值取决于两个进程执行的相对时序,这就是一个竞争条件。使用同步机制(如信号量)可以解决这个问题。(见下节)
triggered机制 SystemVerilog 中,每个 event 类型的对象都有一个名为 triggered 的内置属性。这个属性用于检查事件是否已经被触发。
triggered 属性的作用:
状态检查:triggered 属性返回一个布尔值,指示自上次检查以来事件是否被触发。如果事件被触发,它返回 true;否则返回 false。
重置行为:一旦 triggered 属性被读取,事件的触发状态就会被重置。这意味着如果你再次检查 triggered 属性,除非事件在此期间再次被触发,否则它将返回 false。
event之间可以相互赋值。 当一个事件被赋值给另一个时,原来的事件不会再被触发执行。
1 2 3 4 5 6 7 8 9 10 11 12 13 14 15 16 17 18 19 20 21 22 23 program test_merge_event; event E1,E2,E3; initial begin E2 = E1; fork T1: begin @ E1; $display (“unblock T1”); end T2: begin @ E2; $display (“unblock T2”); end T3: begin @ E3; $display (“unblock T3”); end T4: begin E2 = E3; -> E3; end join end
理解:当一个进程被阻塞,等待某个event被触发时,如果原本的envent被赋值给了另一个event,则原来的envent永远不会被触发,对应的进程一直处于阻塞状态。
Semaphore 信号量 信号量(semaphores)是一种同步机制,用于控制对共享资源的访问,特别是在并发环境中。信号量主要用于解决竞争条件,确保在任何给定时间只有一个特定数量的进程可以访问共享资源。
作用 互斥访问:信号量可以确保对共享资源的互斥访问,防止多个进程同时修改同一资源。
SV中信号量的定义: 1 2 3 4 5 6 7 8 9 10 11 12 13 14 15 16 class semaphore;function new (int keyCount = 0 );function void put(int keyCount = 1 );task get(int keyCount = 1 );function int try_get(int keyCount = 1 );endclass
new用于构造一个新的信号量。
example: 1 2 3 4 5 6 7 8 9 10 11 12 13 14 15 16 17 18 19 20 21 22 23 24 program semaphore_ex; semaphore semBus = new (1 ); initial begin fork agent("AGENT 0" ,5 ); agent("AGENT 1" ,20 ); join end task automatic agent(string name, integer nwait); integer i = 0 ; for (i = 0 ; i < 4 ; i ++ ) begin semBus.get (1 ); $display ("[%0d] Lock semBus for %s" , $time ,name); #(nwait) ; $display ("[%0d] Release semBus for %s" , $time ,name); semBus.put (1 ); #(nwait) ; end endtask endprogram
Mailbox 邮箱,用于进行进程中的数据通信。相当于C中的pipe。 邮箱(Mailbox)是一种用于进程间通信的同步机制。它允许一个进程向邮箱发送(put)消息,而另一个或多个进程可以从邮箱接收(get)这些消息。邮箱在并发编程中非常有用,特别是当需要在不同进程间安全地传递数据时。
定义: 1 2 3 4 5 6 7 8 9 10 11 12 13 14 15 16 17 18 19 20 21 22 23 24 25 class mailbox #(type T = dynamic_singular_type) ; function new (int bound = 0 ); function int num(); task put( T message); function int try_put( T message); task get( ref T message ); function int try_get( ref T message ); task peek( ref T message ); function int try_peek( ref T message ); endclass
example 1 2 3 4 5 6 7 8 9 10 11 12 13 14 15 16 17 18 19 20 21 22 23 24 25 26 27 28 29 30 31 32 33 34 35 36 37 program test_mailbox1 ; mailbox #(string) my_mailbox = new(4) ; initial begin if (my_mailbox) begin fork put_data(); get_data(); join end end task get_data(); string rdata; begin for (int i=0 ; i<6 ; i++) begin #2 ; my_mailbox.get (rdata); $display ("Reading Data %s @time %d" ,rdata, $time ); end end endtask task put_data(); integer i; string t; begin for (i=0 ; i<6 ; i++) begin #2 ; $sformat (t,"%d" ,i); my_mailbox.put (t); my_mailbox.put ("xyz" ); $display ("Writing Data %d @time %d" ,i, $time ); end end endtask endprogram
注意事项:
阻塞行为:get 方法在等待消息时会阻塞进程。如果需要非阻塞行为,可以使用 try_get 或 get_nb 方法。
数据类型:邮箱可以传递任何类型的数据,但发送者和接收者必须对如何解释数据达成一致。
同步和异步:邮箱提供了一种同步机制,但它也可以用于异步通信,取决于如何使用 get 和 put 方法。
Semaphore和Mailbox的比较 1. 目的:信号量用于控制资源访问(主要是互斥),而邮箱用于数据传递。
2. 机制:信号量通过计数来控制资源访问,邮箱通过存储和传递消息来实现通信。
3. 数据处理:信号量不处理数据,邮箱则用于具体的数据传递。
4. 阻塞条件:在信号量中,进程阻塞是因为没有可用资源;在邮箱中,进程阻塞是因为没有消息可读。
Assertions 断言 什么是assertion? 一些检查性的代码,可以用于检测代码的功能覆盖率,做形式化验证等。assertion用于验证设计的行为是否符合预期。断言主要用于动态验证,即在仿真运行时检查特定的条件或属性。它们是确保设计符合其规范的关键组成部分,特别是在复杂的硬件设计和验证过程中。
断言的用途 1. 检测错误:在设计早期发现错误,如逻辑错误、时序问题。例如FIFO的读空写满,FSM一些非法状态的跳转,协议的握手等。
2.文档化设计意图:断言可以作为设计意图的一部分,帮助其他工程师理解代码的预期行为。
2. 提高验证覆盖率:使用断言可以更全面地验证设计,确保覆盖各种边缘情况。
3. 减少调试时间:当断言失败时,它们提供了关于错误位置和原因的即时反馈。
example: 检查a的上升沿的3个时钟周期内,b是否到达上升沿。verilog 的写法:
1 2 3 4 5 6 7 8 9 10 11 12 13 14 15 16 always @(posedge a) begin repeat (1 ) @(posedge clk); fork : a_to_b begin @(posedge b) $display ("SUCCESS: b arrived in time\n" , $time ); disable a_to_b; end begin repeat (3 ) @(posedge clk); $display ("ERROR:b did not arrive in time\n" , $time ); disable a_to_b; end join end
assertion的写法:
1 2 3 a_to_b_chk: assert property @(posedge clk) $rose (a) |-> ##[1 :3 ] $rose (b);
Assertion Based Verification 对于时序检查很有用 ,同时可以检查功能覆盖率
例,宏定义
1 2 3 4 5 6 7 8 9 10 11 module test();… `ifndef NO_INLINED_ASSERTION st_hold: assert property ( @(posedge clk) (!reset && (!st_in && ready_in)) |-> ##1 (st_in [*1 :$]) ##0 accepted_in) else $display (“st_in did not hold till accepted_in”); `endif … endmodule
Assertion 库 Open Verification Library (OVL)
Assertion优缺点:
1.更容易DEBUG
会降低仿真速度。
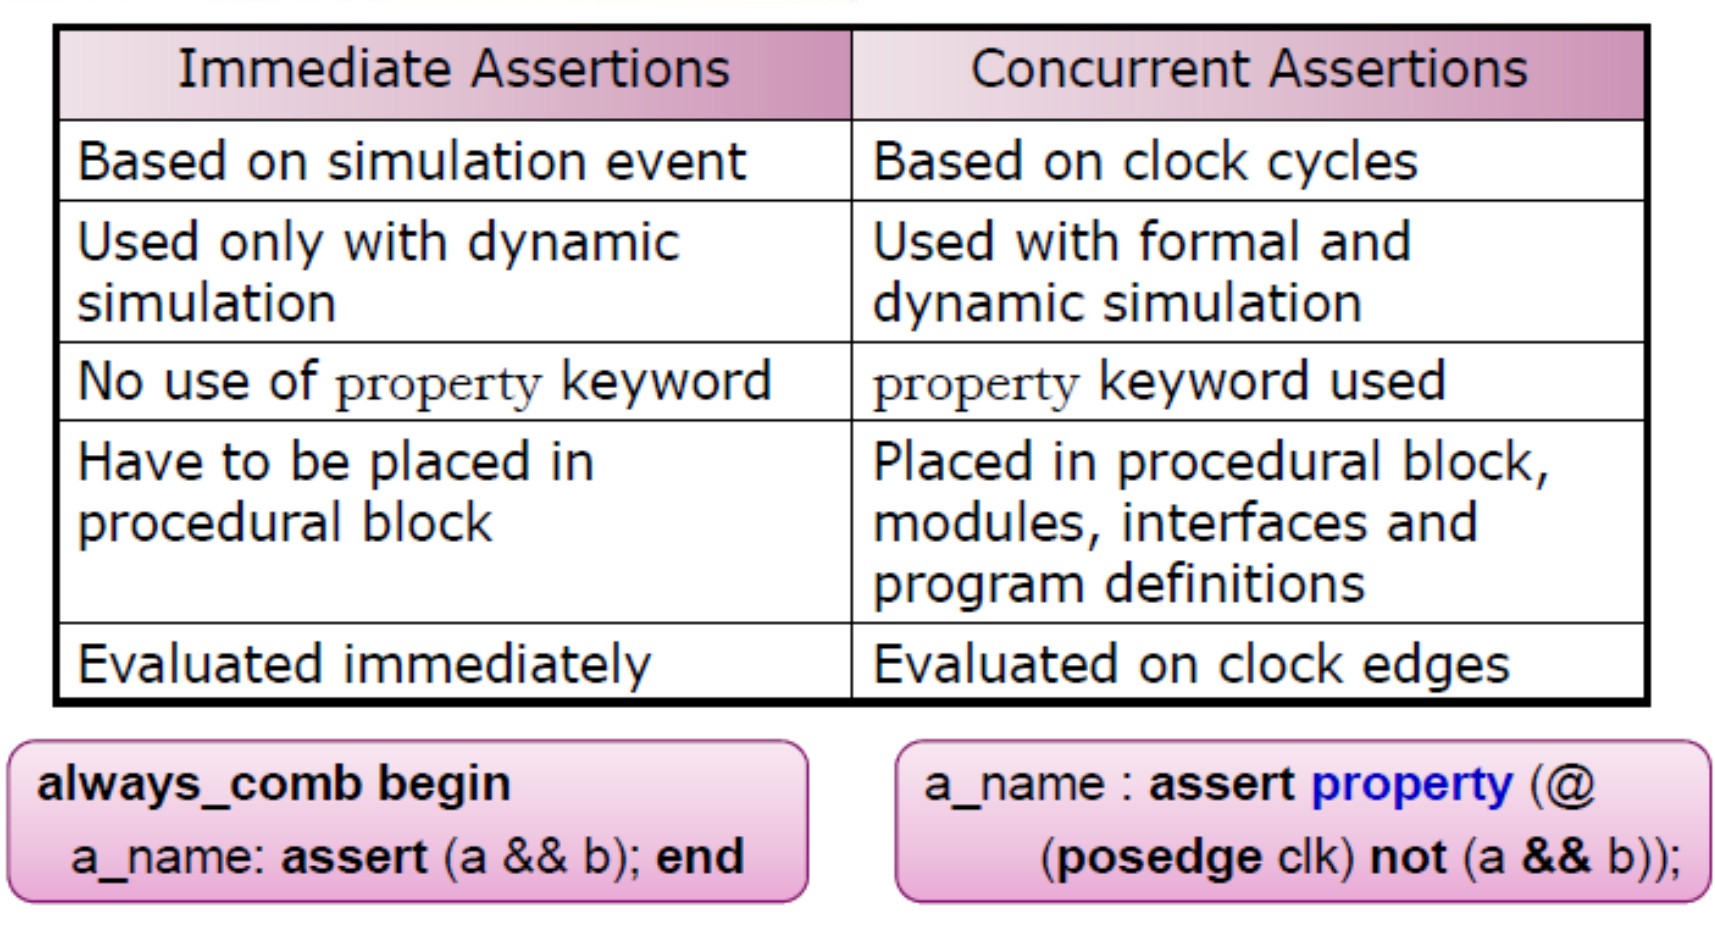
Assertion的分类: 即时断言(Immediate Assertions):
并发断言(Concurrent Assertions):
1 2 3 4 assertion_label : assert (expression) pass block code; else fail block code;
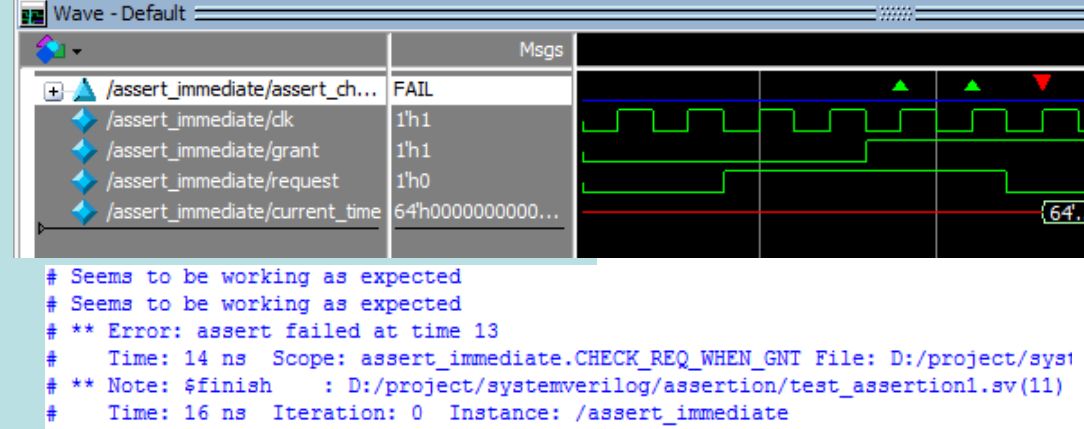
1 2 3 4 5 6 7 8 9 10 11 12 13 14 15 16 17 18 19 20 21 22 23 24 25 26 27 28 29 30 module assert_immediate(); reg clk, grant, request; time current_time; initial begin clk = 0 ; grant = 0 ; request = 0 ; #4 request = 1 ; #4 grant = 1 ; #4 request = 0 ; #4 $finish ; end always #1 clk = ~clk; always @ (posedge clk) begin if (grant == 1 ) begin CHECK_REQ_WHEN_GNT : assert (grant && request) begin $display ("Seems to be working as expected" ); end else begin current_time = $time ; #1 $error ("assert failed at time %0t" , current_time); end end end endmodule
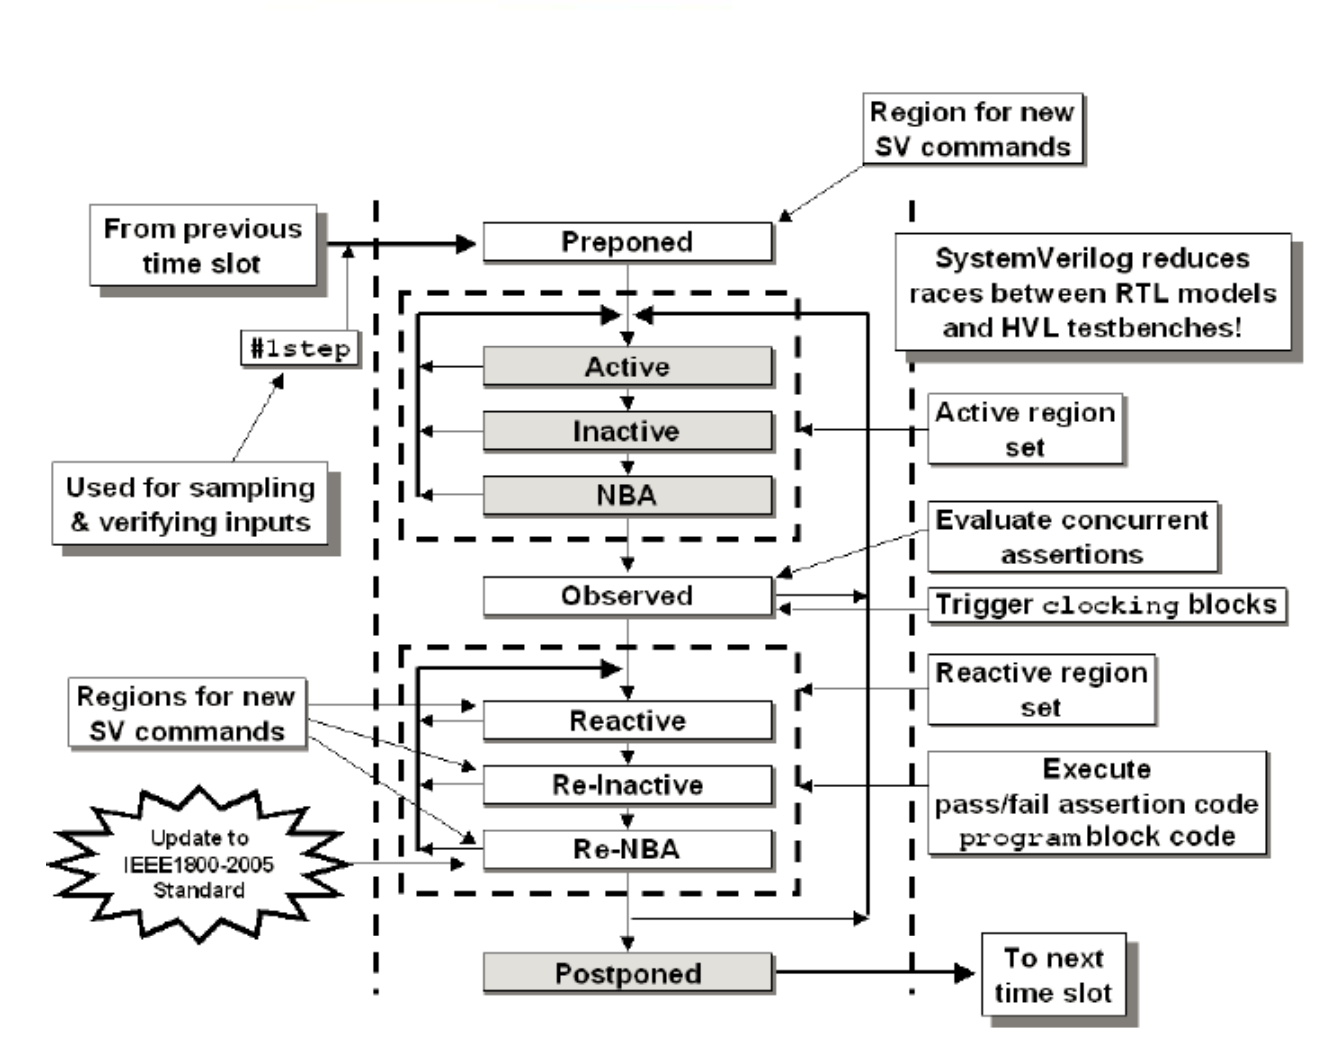
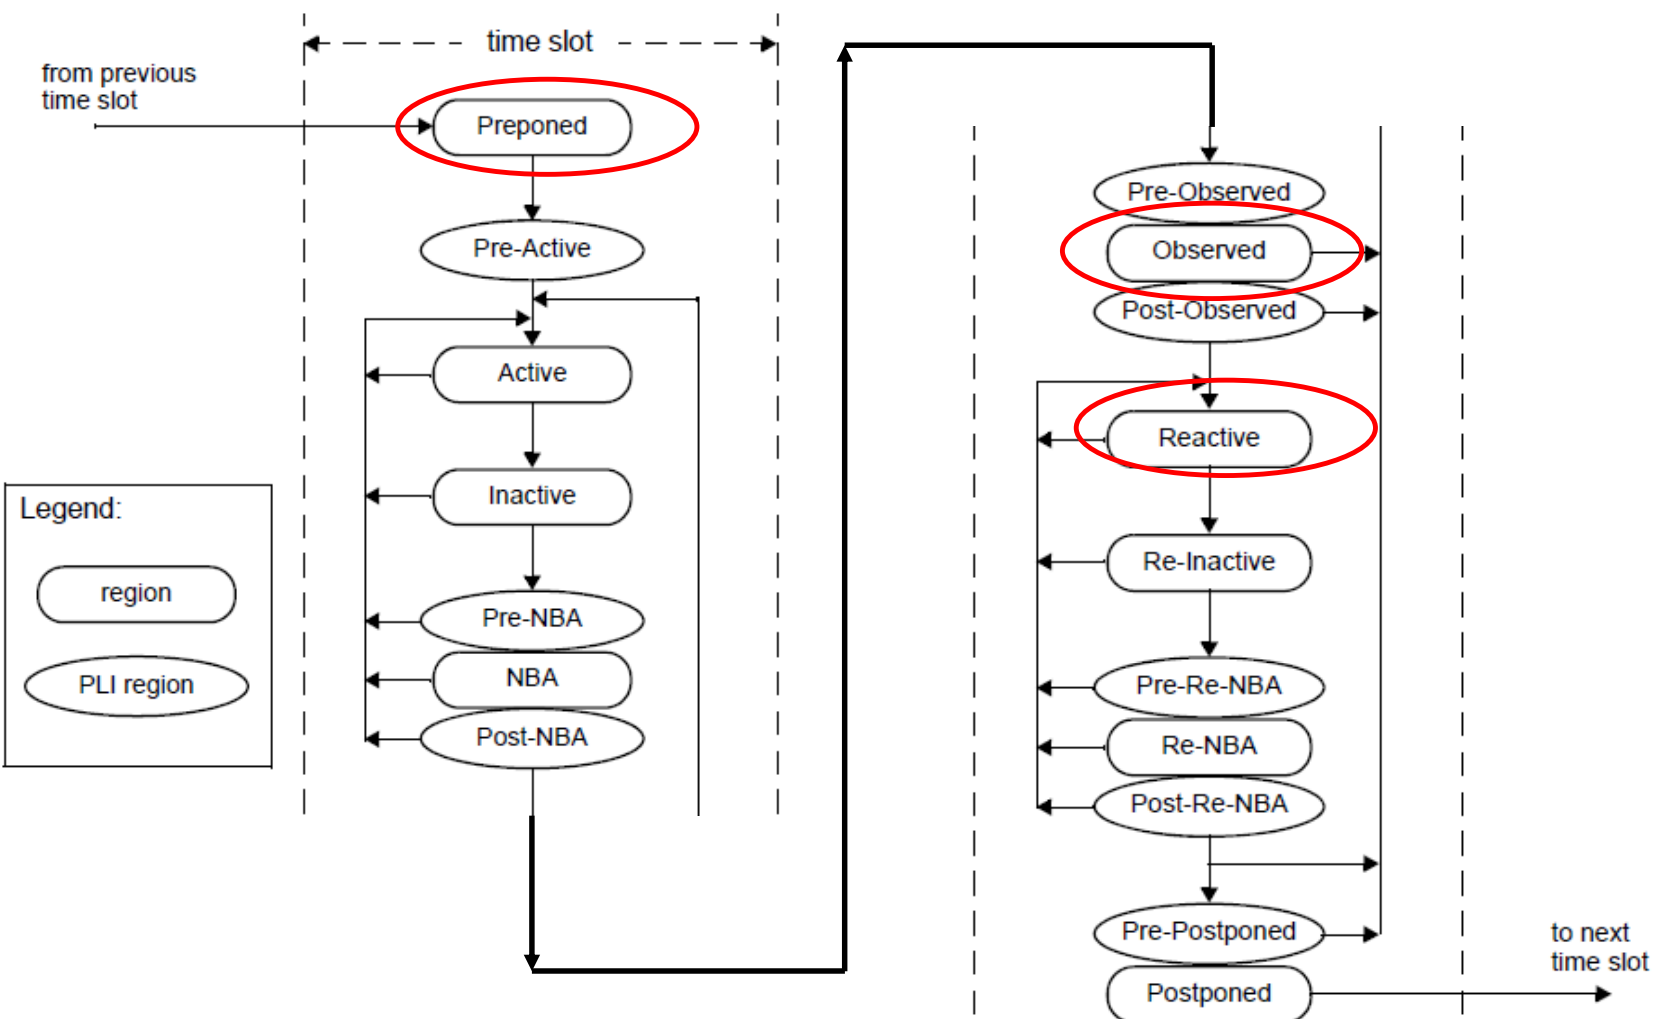
SV的调度顺序
preponed : 这个阶段发生在仿真时间步的最开始,进行变量的取值。observed :在这个阶段,可以观察到所有信号和变量的状态,但不应该产生任何新的活动或更改状态。这主要用于监控和检查目的。reactive :在这个阶段,可以根据之前阶段的观察结果做出反应。(pass/fail)
Active Phase :在这个阶段执行大部分代码,包括非阻塞赋值的右侧表达式和大多数程序语句。
Inactive Phase :在这个阶段,非阻塞赋值的左侧被更新。
NBA (Non-Blocking Assignment) Update Phase :在这个阶段,所有非阻塞赋值的更新发生。
Preponed Phase :这是一个特殊的阶段,用于处理一些特殊的建模需求,如在所有其他活动之前读取信号的最终值。
Observed Phase :在这个阶段,可以观察到所有赋值的结果,但不允许更改任何状态。
Reactive Phase :在这个阶段,可以根据之前阶段的观察结果来做出反应,如调整内部状态或发出新的输出。
Postponed Phase :这是仿真时间步的最后阶段,通常用于处理仿真结束等特殊情况。
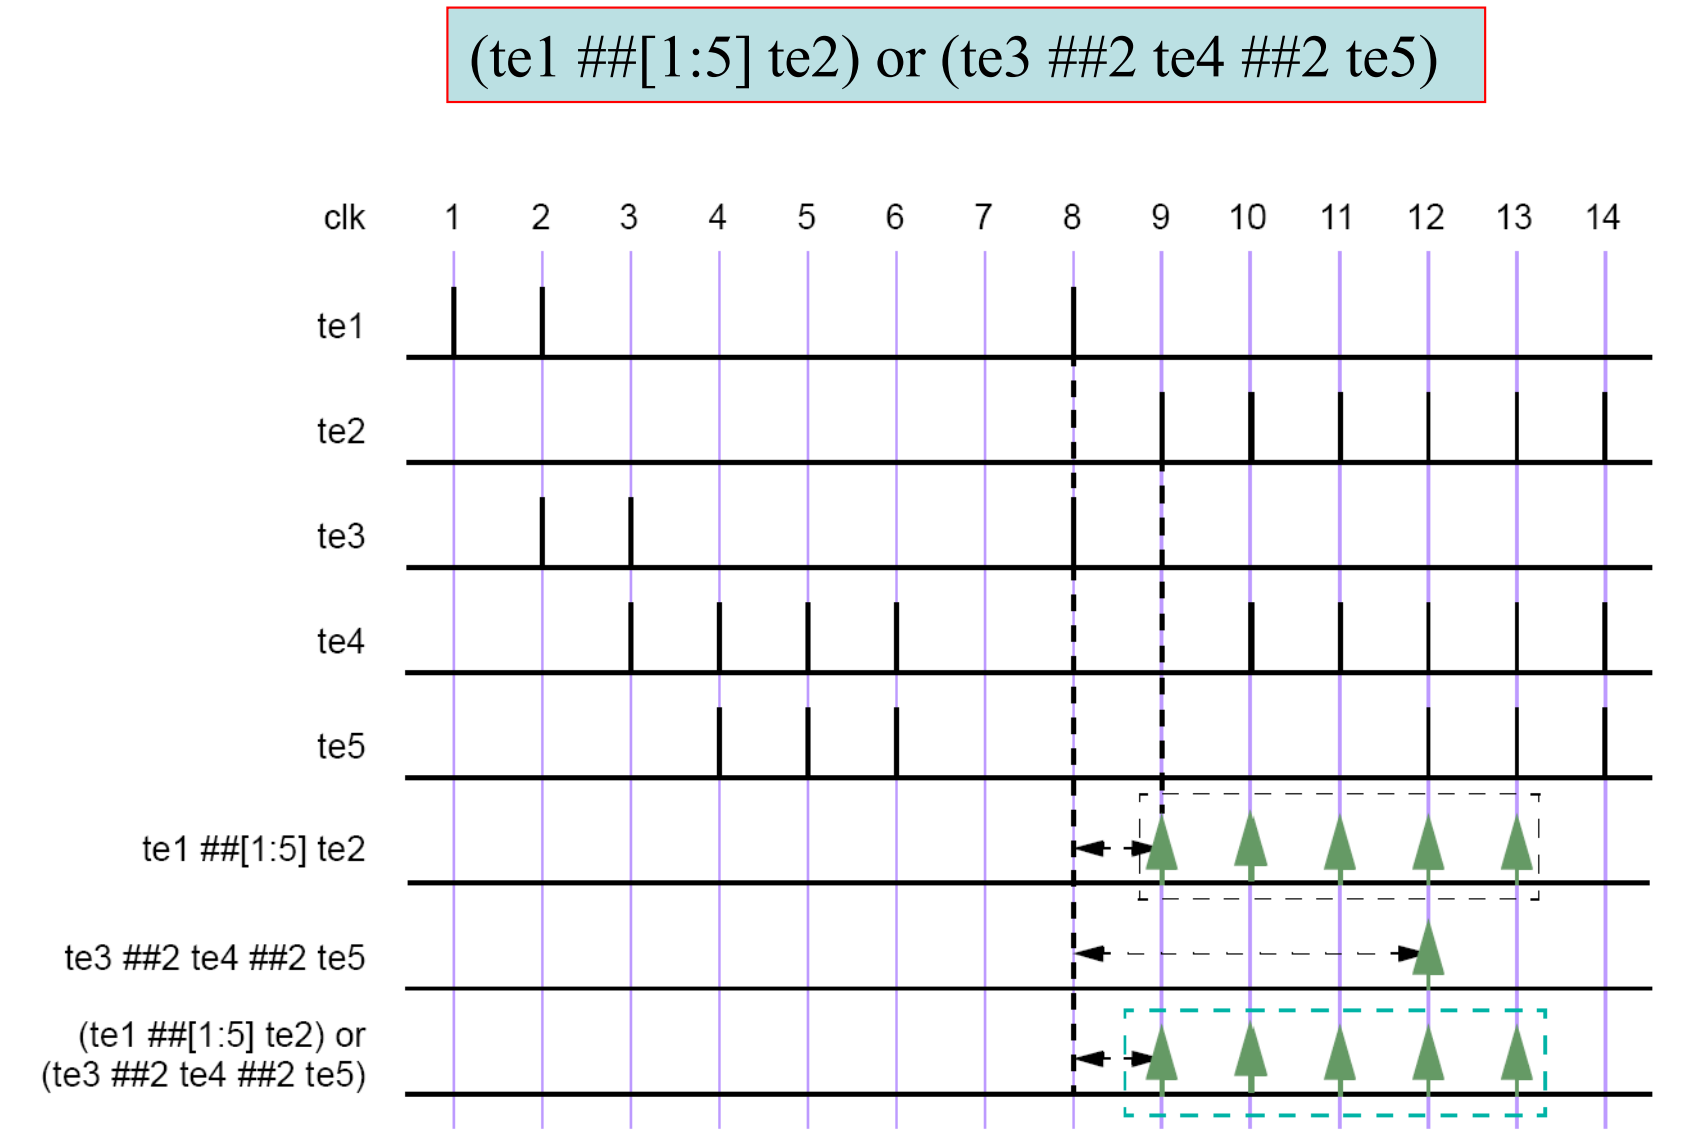
并发断言 Concurrent assertions: example: 1 2 3 4 5 6 7 8 9 10 11 12 13 sequence request Req; endsequence sequence acknowledge ##[1 :2 ] Ack; endsequence property handshake; @(posedge Clock) request |-> acknowledge; endproperty assert property (handshake);
sequence 1 2 3 sequence name_of_sequence; <test expression>; endsequence
sequence 用于描述一系列事件发生的顺序。它定义了一组在时间上相关的条件,这些条件必须按特定的顺序发生。
1 2 3 sequence seq_A_before_B; A ##1 B; endsequence
时序检查 两个井号代表一个时钟周期。
1 2 3 4 5 6 ##3 req ##1 gnt ##1 !req
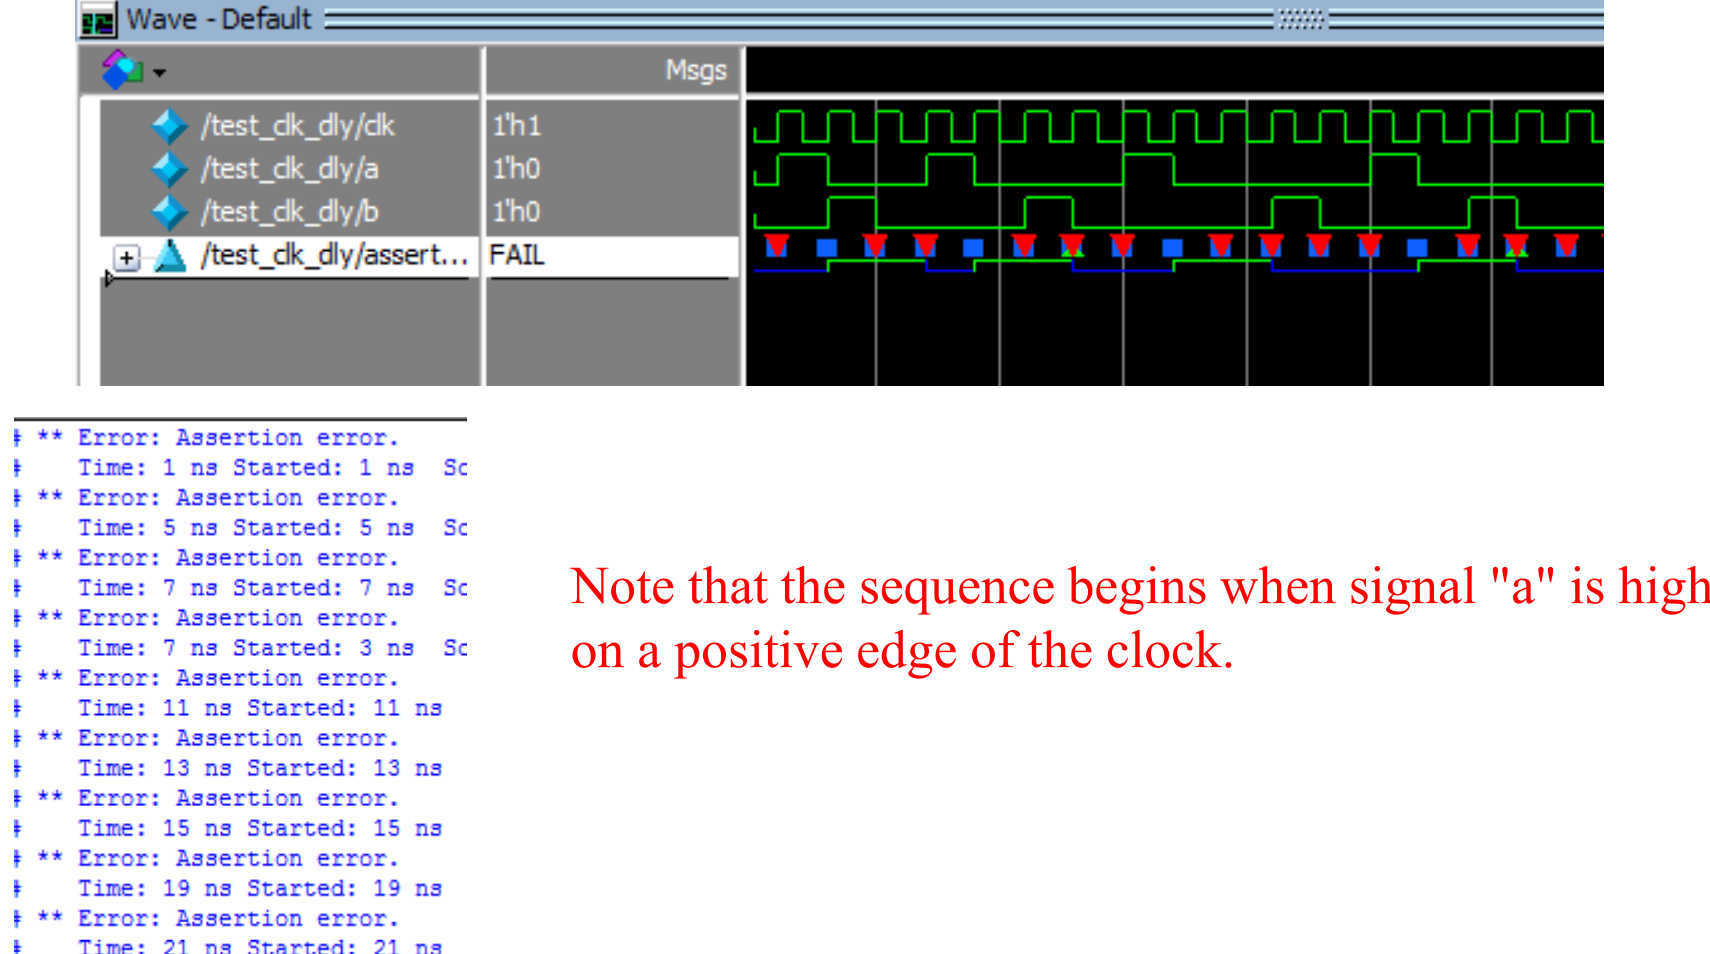
example 1 2 3 4 5 6 7 8 9 10 11 12 13 14 15 16 17 18 19 20 21 22 23 24 25 26 27 28 29 30 31 32 33 34 35 36 37 38 module test_clk_dly; reg a,b,clk; initial fork clk=1'b0 ; a=1'b0 ;b=1'b0 ; #1 a=1'b1 ; #3 begin a=1'b0 ; b=1'b1 ; end #5 b=1'b0 ; #7 a=1'b1 ; #9 a=1'b0 ; #11 b=1'b1 ; #13 b=1'b0 ; #15 a=1'b1 ; #17 a=1'b0 ; #21 b=1'b1 ; #23 b=1'b0 ; #25 a=1'b1 ; #27 a=1'b0 ; #29 b=1'b1 ; #31 b=1'b0 ; join always #1 clk=!clk; sequence s1; @(posedge clk) a ##2 b; endsequence property p1; s1; endproperty assertion1: assert property (p1); endmodule
1 2 3 4 5 6 7 8 9 10 11 sequence s1; @(posedge clk) a ##1 b ##[0 :3 ] c; endsequence sequence s1; @(posedge clk) a ##1 b ##[0 :$] c; endsequence
重复(repetition) consecutive repetition consecutive 重复指的是事件必须连续发生,没有间隔。
example 1 2 3 4 a ##1 b ##1 b ##1 b ##1 c a ##1 b[*3 ] ##1 c
1 2 3 4 property p21; @(posedge clk) $rose (start) |-> ##2 (a[*3 ]) ##2 stop ##1 !stop; endproperty a21:assert property (p21);
Goto Repetition goto 重复允许在重复的事件之间有间隔,但一旦开始,后续事件必须连续发生。
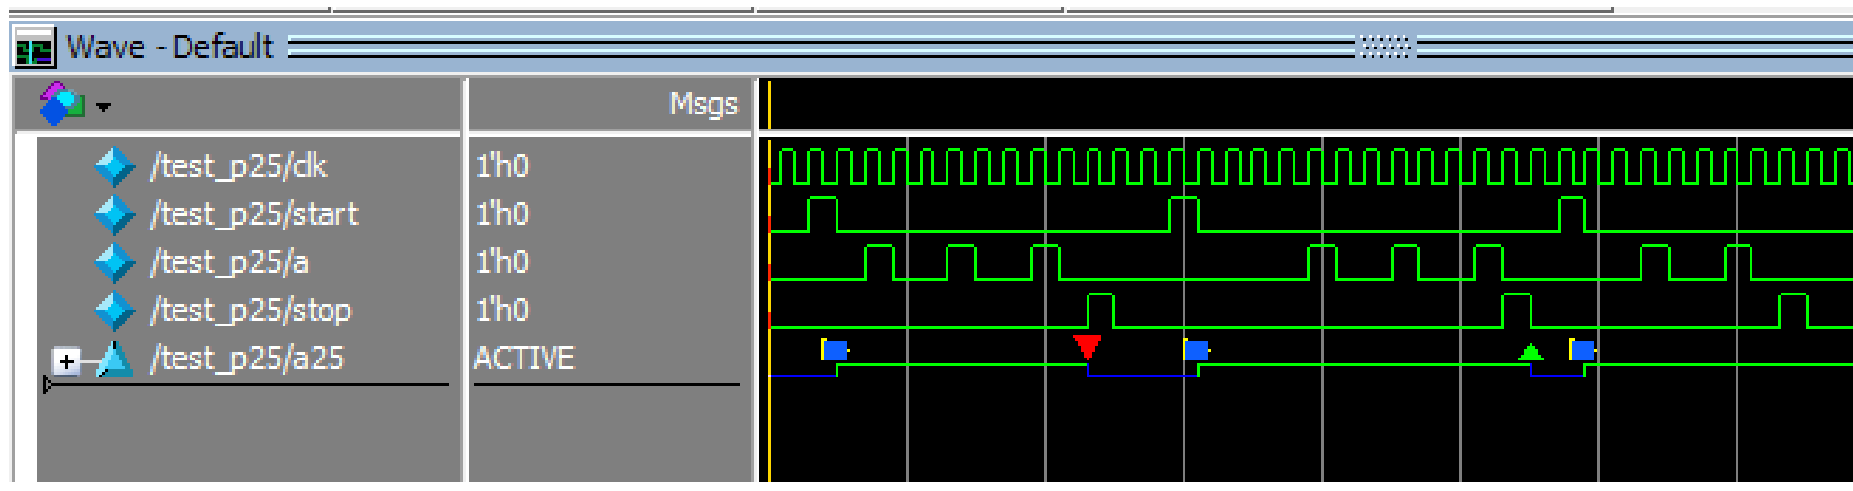
example 1 2 3 4 property p25; @(posedge clk) $rose (start) |-> ##2 (a[->3 ]) ##1 stop; endproperty a25: assert property (p25);
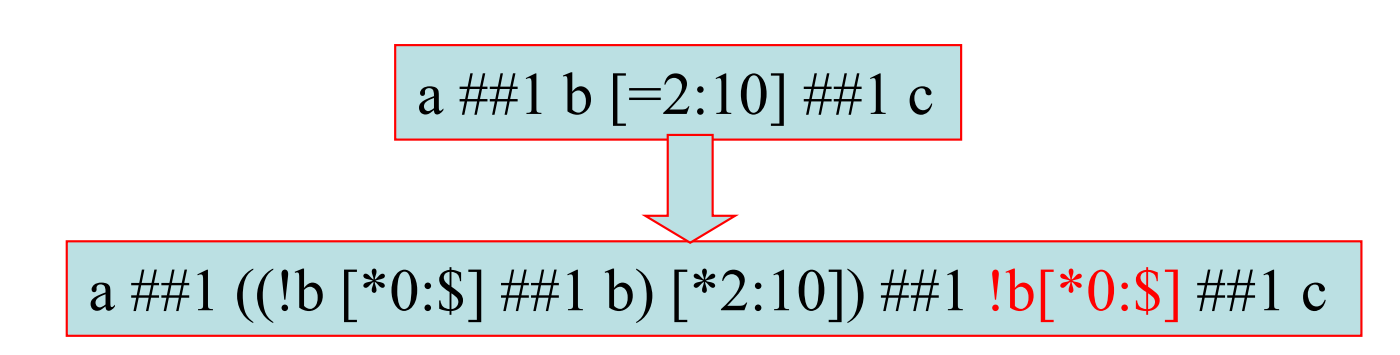
Nonconsecutive Repetition nonconsecutive 重复允许事件之间有任意数量的时钟周期间隔。相当于Goto Repetition最后一个重复周期与后面的信号序列不用连续。
example 1 2 3 4 property p26; @(posedge clk) $rose (start) |-> ##2 (a[=3 ]) ##1 stop ##1 !stop; endproperty a26:assert property (p26);
throughout 持续 在 SystemVerilog 的序列(sequence)中,throughout 是一个关键字,用于描述一种强制性的关系,即一个事件在另一个事件发生的整个持续时间内必须为真。这种构造在描述复杂的时序关系时非常有用,特别是当一个条件必须在另一个条件的整个持续期间内持续成立时。
example 1 2 3 4 sequence burst_rule1; @(posedge mclk) $fell (burst_mode) ##0 (!burst_mode) throughout (##2 ((trdy==0 )&&(irdy==0 )) [*7 ]); endsequence
within 在 SystemVerilog 的序列(sequence)中,within 是一个关键字,用于描述一个序列必须完全发生在另一个序列的持续时间内的关系。(注意和throughout的区别)
example 1 2 3 4 5 6 7 8 9 10 11 12 13 14 15 16 17 18 19 20 sequence s32a; @(posedge clk) ((!a&&!b) ##1 (c[->3 ]) ##1 (a&&b)); endsequence sequence s32b; @(posedge clk) $fell (start) ##[5 :10 ] $rose (start); endsequence sequence s32;@(posedge clk) s32a within s32b; endsequence property p32; @(posedge clk) $fell (start) |-> s32; endproperty a32: assert property (p32);
and 在 SystemVerilog 的序列(sequence)中,and 关键字用于描述两个或多个序列必须同时发生的关系。两个seq必须同时开始,但不必同时结束。
example 1 2 3 4 5 6 7 8 9 10 11 12 13 sequence s27a; @(posedge clk) a ##[1 :2 ] b; endsequence sequence s27b; @(posedge clk) c ##[2 :3 ] d; endsequence property p27; s27a and s27b; endproperty a27: assert property (p27);
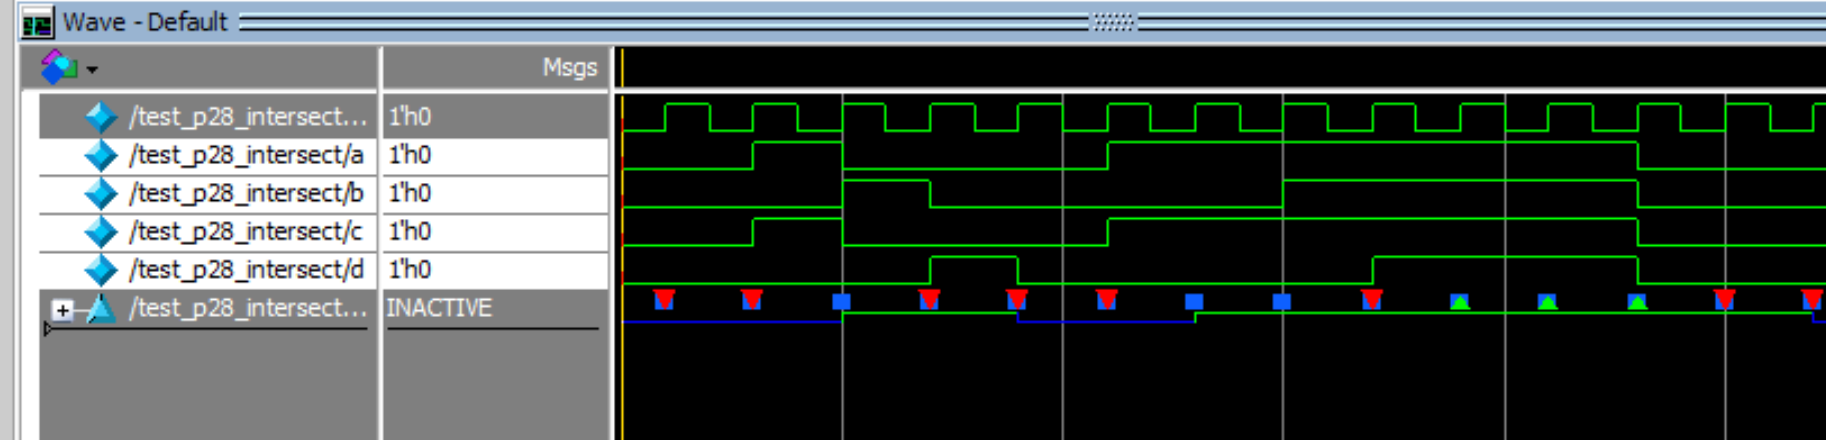
intersect 交集 在 SystemVerilog 的序列(sequence)中,intersect 关键字用于描述两个序列在某个时间点上有重叠的关系。intersect 用于指定两个序列在某个时间点上必须有重叠。这意味着这些序列中的事件或条件必须在某个时刻同时为真,它们的开始和结束时间相同。
example 1 2 3 4 5 6 7 8 9 10 11 12 sequence s28a; @(posedge clk) a##[1 :2 ] b; endsequence sequence s28b; @(posedge clk) c##[2 :3 ] d; endsequence property p28; @(posedge clk) s28a intersect s28b; endproperty a28:assert property (p28);
和throughout的区别 throughout 要求一个序列在另一个序列的整个时间范围内持续为真。
or 在 SystemVerilog 的序列(sequence)中,or 关键字用于描述两个或多个序列中的任意一个满足条件即可的关系。
example
property property 用于表达更复杂的断言条件,它可以包含一个或多个 sequence,并支持逻辑运算(如 AND、OR、NOT)和其他控制结构(如 if-then-else)。
1 2 3 4 5 property name_of_property; <test expression>; or <complex sequence expressions>; endproperty
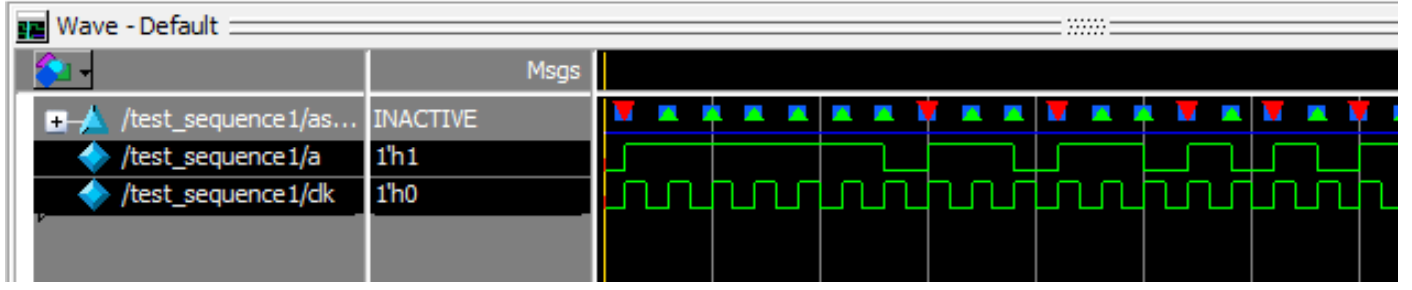
example: 1 2 3 4 5 6 7 8 9 10 11 12 13 14 15 16 17 18 19 20 21 22 23 24 25 26 27 28 29 30 31 module test_sequence1; reg a,clk; initial fork clk=1'b0 ; a=1'b0 ; #1 a=1'b1 ; #13 a=1'b0 ; #15 a=1'b1 ; #19 a=1'b0 ; #21 a=1'b1 ; #25 a=1'b0 ; #27 a=1'b1 ; #29 a=1'b0 ; #31 a=1'b1 ; #33 a=1'b0 ; #35 a=1'b1 ; join always #1 clk=!clk;sequence s1; @(posedge clk) a; endsequence property p1; s1; endproperty assertion1: assert property (p1); endmodule
系统函数: 1 2 3 4 5 6 7 8 9 10 11 12 13 14 15 16 17 $rose (signal)$fell (signal)$stable (signal)$changed (signal)$past (signal[, n])$countones (expression)$onehot (expression)$onehot0 (expression)first_match ()
property 的否定 1 2 3 4 5 6 7 8 sequence s6; @(posedge clk) a ##2 b; endsequence property p6; not s6; endproperty a6 : assert property (p6);
蕴含操作: 等同于逻辑学中的蕴含。真值表:
a
b
a->b
0
0
1
0
1
1
1
0
0
1
1
1
a|->b = a&b | ~a
1 2 3 4 5 property p8; @(posedge clk) a |-> b; endproperty a8 : assert property (p8);
1 2 3 4 property p9; @(posedge clk) a |=> b; endproperty a9 : assert property (p9);
1 2 3 4 property p10; @(posedge clk) a |-> ##2 b; endproperty a10 : assert property (p10);
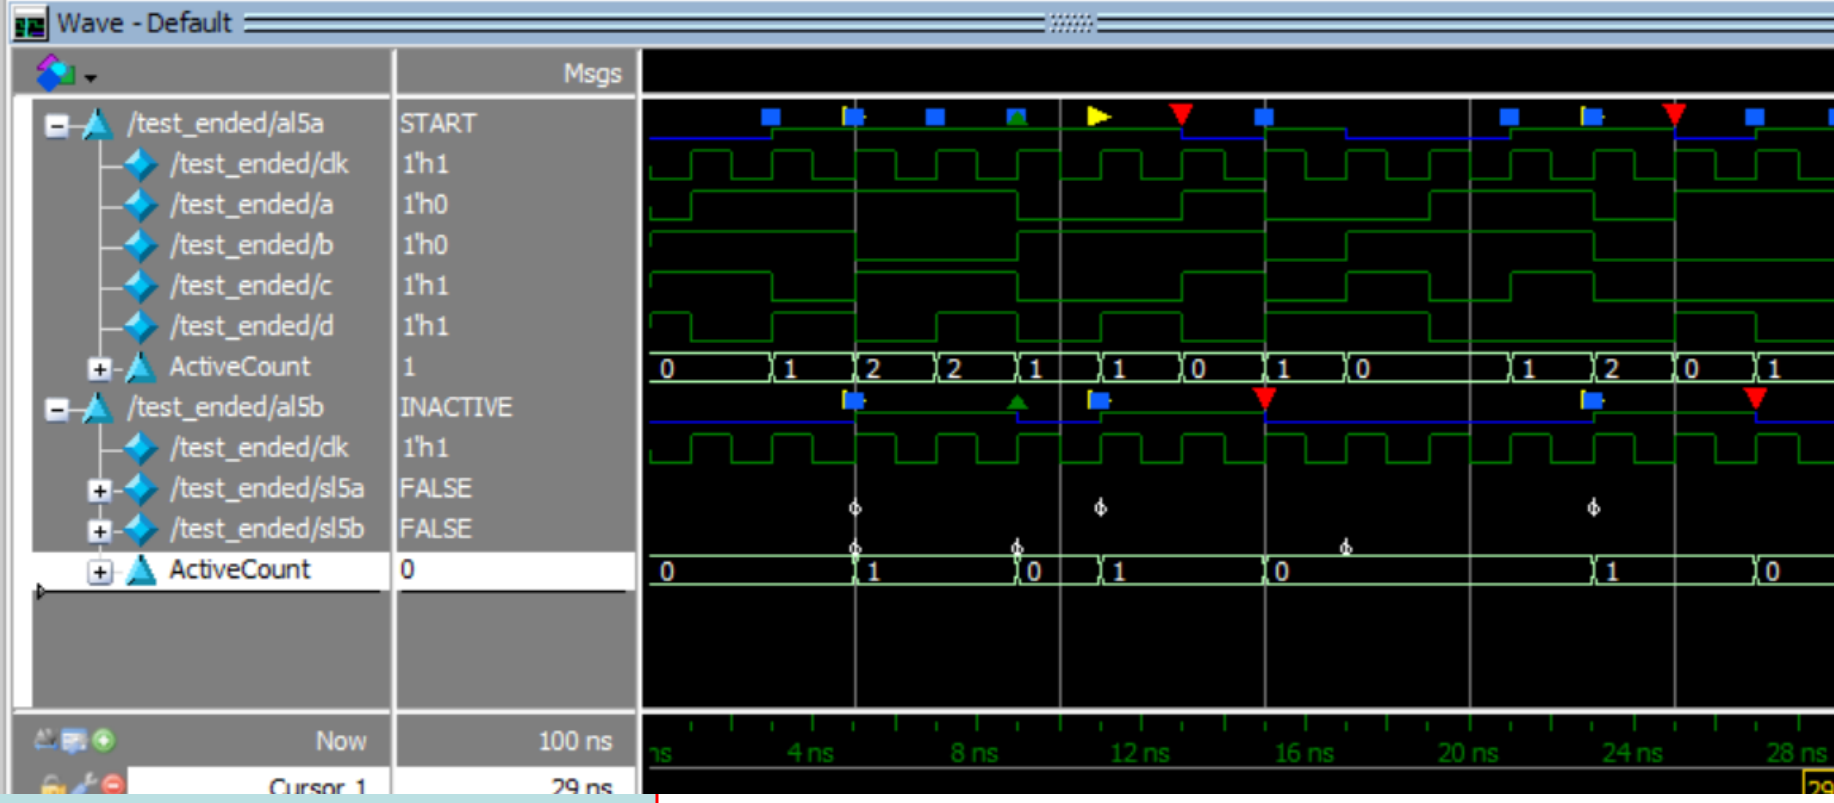
ended关键词控制断言检查的时间 ended 关键词用于检测一个序列是否已经到达了其结束点。这对于确定某个特定的时序模式是否已经完整地发生非常有用。
1 2 3 4 5 6 7 8 9 10 11 12 13 14 15 16 17 18 sequence sl5a; @(posedge clk) a ##1 b; endsequence sequence sl5b; @(posedge clk) c ##1 d; endsequence property pl5a; sl5a |=> sl5b; endproperty property pl5b; sl5a.ended |-> ##2 sl5b.ended ; endproperty al5a: assert property (@(posedge clk) pl5a); al5b: assert property (@(posedge clk) pl5b);
disable iff iff:if and only if
1 2 3 4 5 6 property p34; @(posedge clk) disable iff (reset) $rose (start) |=> a[=2 ] ##1 b[=2 ] ##1 !start ; endproperty a34: assert property (p34);
assert assert 语句用于实际应用断言。它将 property 应用于设计中的特定点,以验证在那个点上 property 是否为真。
1 assert property (prop_X_implies_Y) else $error ("Assertion failed" );
sequence,property,assert的关系: sequence 提供了描述事件顺序的基础。
property 利用 sequence(可能是多个)来表达更复杂的逻辑条件。
assert 将 property 应用于实际的硬件设计,以确保在运行时满足这些条件。
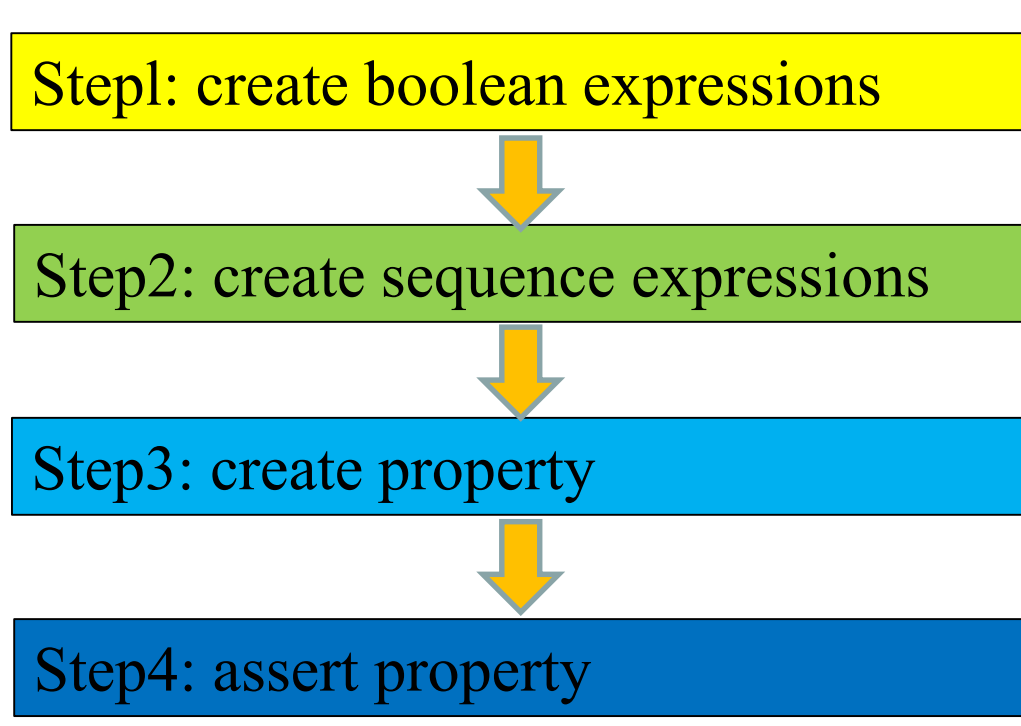
小结 理解以下sequence,property和assert的作用:
1 2 3 4 5 6 7 8 9 10 11 12 13 14 15 16 17 18 19 20 21 22 23 24 25 26 27 28 29 30 31 32 33 34 35 36 37 38 39 40 41 42 43 44 45 46 47 48 49 50 51 52 53 54 55 56 57 58 59 60 61 62 63 64 65 66 67 68 sequence s4; @(posedge clk) a ##2 b; endsequence sequence s2; @(posedge clk) $rose (a); endsequence sequence s3_lib (a,b); a || b; endsequence sequence s1; @(posedge clk) a ##1 b ##1 c; endsequence sequence s1; @(posedge clk) a ##1 b ##[0 :3 ] c; endsequence sequence s1; @(posedge clk) a ##1 b ##[0 :$] c; endsequence property p6; not s6; endproperty property p8; @(posedge clk) a |-> b; endproperty a8 : assert property (p8); property p9; @(posedge clk) a |=> b; endproperty a9 : assert property (p9); property p12; @(posedge clk) (a && b) |-> ##[1 :3 ] c; endproperty a12 : assert property (p12); property p10; @(posedge clk) a |-> ##2 b; endproperty a10 : assert property (p10); property p13; @(posedge clk) (a && b) |-> ##[0 :2 ] c; endproperty a13 : assert property (p13); property p14; @(posedge clk) a |-> ##[1 :$] b ##[0 :$] c; endproperty a14 : assert property (p14); property p17; @(posedge clk) c ? d == a:d == b; endproperty a17: assert property (p17); property p19; @(posedge clk) (c && d) |-> ($past ((a&&b),2 ) == 1'b1 ); endproperty a19: assert property (p19);
如何在仿真中加入assertion 命令行:
如何在testbench中绑定assertion模块 Random coverage 使用ramdom的原因 传统的directed test case无法覆盖所有情况,同时,directed test case只能验证设计时的预期功能。
因此需要引入随机。
random应用场景:
sv 中的random 关键字rand randc (random cycle)
每个循环调用时,自动变更为与上一个值不同的随机数,并且遍历取值范围。
constraint block 在 SystemVerilog 中,约束块(Constraint Block)是一种用于随机化测试中的强大机制,它允许你为类的成员变量指定特定的约束条件。这些约束用于控制随机生成的数据,以满足特定的测试需求或设计规范。
constraint 可以定义在class 之外。例:
1 2 3 4 5 6 7 class XYPair;rand integer x, y;constraint c;endclass constraint XYPair::c { x < y; }
constraint 可以被继承,例:
1 2 3 4 5 6 7 class A; rand integer x; constraint c { x < 0 ; } endclass class B extends A; constraint c { x > 0 ; } endclass
求解器randomize() randomize() 方法用于随机化类中标记为 rand 或 randc 的成员变量。它根据定义在类中的约束(如果有的话)生成随机值。
randomize()是一个虚函数,每当constraint被继承时,原函数被重载。
pre_randomize()和post_randomize() 如其名,是在randomize()前后执行的2个函数。可以被重载。
post_randomize() 方法在每次调用 randomize() 方法之后自动执行。
在被重载时,pre_randomize()和post_randomize()都会先执行父类的方法,然后执行重载的内容。
inside 指定表达式的范围 1 2 3 4 5 6 7 8 9 10 class Busrand bit [15 :0 ] addr;randc bit [31 :0 ] data;constraint range1{ addr inside {[0 :100 ],[1024 :16384 ]}; data > 1000 ; data < 10000 ; } endclass
dist 指定权重分布 1 2 3 4 5 rand int src, dst;costraint c1 { src dist {0 :=40 , [1 :3 ]:=60 }; dst dist {0 :=40 , [1 :3 ]:/60 }; }
:= 用于相同分布
多维约束 1 2 3 4 5 6 7 rand logic [15 :0 ] b,c,d;costraint c1 { b<d; c==b; d<30 ; c>=25 ; }
条件约束 可以包含蕴含操作:
1 2 3 bit [3 :0 ] a,b;constraint c {(a==0 )->(b==1 );}
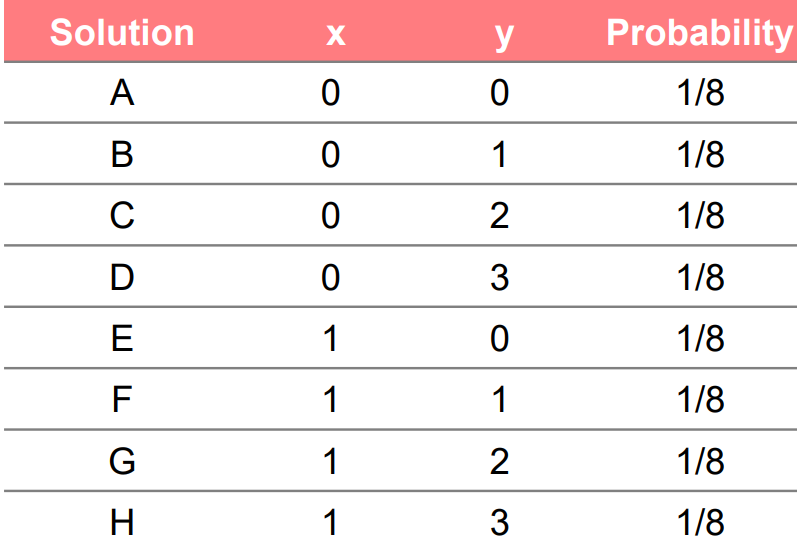
约束的概率问题 1 2 3 4 class Unconstrained; rand bit x; rand bit [1 :0 ] y; endclass
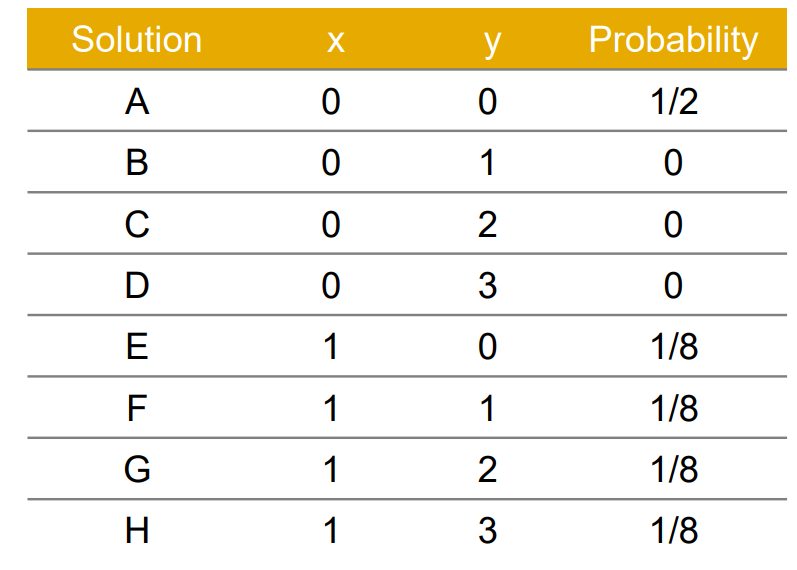
1 2 3 4 5 class Imp1; rand bit x; rand bit [1 :0 ] y; constraint c_xy { (x==0 )->y==0 ; } endclass
迭代约束 1 2 3 4 5 6 7 8 9 Class C; rand byte A[4 ]; constraint C1{ foreach (A[i]) A[i]inside {2 ,4 ,8 ,16 };} constraint C2{ foreach (A[j]) A[j]> 2 *j;} endclass
solve before :控制求解顺序 1 2 3 4 5 6 class B; rand bit s; rand bit [31 :0 ] d; constraint c { s -> d == 0 ; } constraint order { solve s before d; } endclass
function in constraints 用途:使用function来表示一些复杂的分布情况。
1 2 3 4 5 6 function int count_ones ( bit [9 :0 ] w ); for ( count_ones = 0 ; w != 0 ; w = w >> 1 ) count_ones += w & 1'b1 ; endfunction constraint C1 { length == count_ones( v ) ; }
constraint mode: 控制约束的开启和关闭 内建函数:constraint_mode(),默认0 为inactive,1为activate
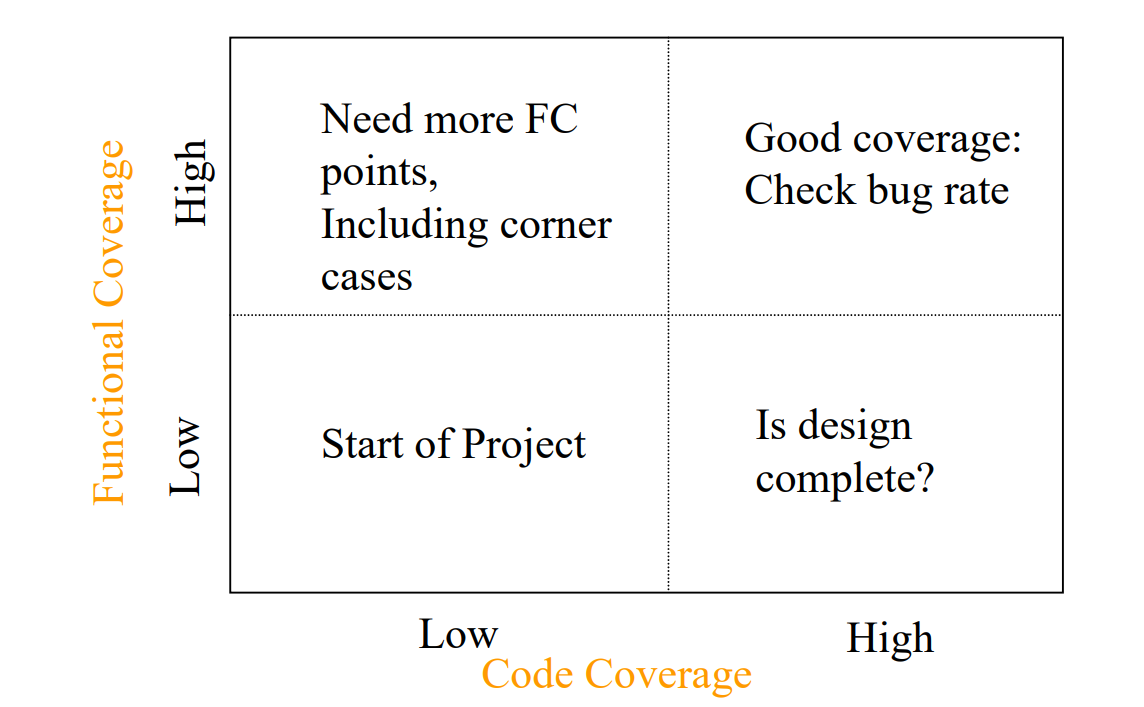
覆盖率 2个方面:代码覆盖率 和功能覆盖率 。
代码覆盖率可以被自动收集量化。
代码覆盖率的类型:
行覆盖率(Line Coverage/Statement Coverage):
块覆盖率(Block Coverage)
表达式覆盖率(Expression Coverage):
分支覆盖率(Branch Coverage):
条件覆盖率(Condition Coverage):
切换覆盖率(Toggle Coverage):
状态机覆盖率(FSM Coverage):
路径覆盖率(Path Coverage):
断言覆盖率(Assertion Coverage):
代码覆盖率不关心具体功能的实现。因此无法保证功能的正确性。
功能覆盖率Functional Coverage): 功能覆盖率是衡量测试用例是否覆盖了设计的所有功能方面的度量。它关注于设计的功能需求是否得到了充分的测试。
功能覆盖率需要人工定义。根据对设计的理解设计不同的功能模块。Based on the DUT spec and test plan, define what needs to be covered.
步骤:
cover group 覆盖组是一组相关的覆盖点和/或交叉覆盖点的集合。它用于组织和封装相关的覆盖点,以便于管理和分析。
1 2 3 4 covergroup cg;... endgroup cg cg_inst = new ;
1 2 3 4 5 6 7 8 9 10 11 12 13 14 15 16 17 18 19 20 21 22 23 24 25 26 27 28 29 30 31 module mem(simple_bus sb);bit [7 :0 ] data, addr;event write_event; cover property (@(posedge sb.clock ) sb.write_ena ==1 ) -> write_event; endmodule program automatic test(simple_bus sb); covergroup Write_cg @($root.top .m1 .write_event ); coverpoint $root.top .m1 .data ; coverpoint $root.top .m1 .addr ; endgroup Write_cg wcg; initial begin wcg = new ; sb.write_ena <= 1 ; ... #10000 $finish ; end endprogram
coverage point 覆盖点是对单个变量或表达式的覆盖度量。
bin :对功能点分组 1 2 3 4 5 6 7 8 9 10 11 12 13 14 15 16 17 18 19 20 program main;bit [0 :2 ] y;bit [0 :2 ] values[$]= '{3 ,5 ,6 };covergroup cg;cover_point_y : coverpoint y { bins a = {0 ,1 }; bins b = {2 ,3 }; bins c = {4 ,5 }; bins d = {6 ,7 }; } endgroup cg cg_inst = new (); initial foreach (values[i]) begin y = values[i]; cg_inst.sample (); end endprogram
Transitional functional point bin 1 2 3 4 5 6 7 8 9 10 11 12 13 14 15 16 17 18 program main; bit [0 :3 ] y; bit [0 :2 ] values[$]= '{3 ,5 ,6 }; covergroup cg; cover_point_y : coverpoint y { bins tran_34 = (3 =>4 ); bins tran_56 = (5 =>6 ); } endgroup cg cg_inst = new (); initial foreach (values[i])begin y = values[i]; cg_inst.sample (); end endprogram
wildcard bin:通配分组 分组中的x,z,?会和0,1产生通配。
1 2 3 4 5 6 7 8 9 10 11 12 13 14 15 16 program main; reg [0 :3 ] y; reg [0 :3 ] values[$]= '{ 4'b1100 ,4'b1101 ,4'b1110 ,4'b1111 }; covergroup cg; cover_point_y : coverpoint y { wildcard bins g12_15 = { 4'b11 ?? }; } endgroup cg cg_inst = new (); initial foreach (values[i])begin y = values[i]; cg_inst.sample (); end endprogram
ignore_bin 忽略的分组 ignore_bin 用于在覆盖率分析中排除特定的值或值范围。它有助于简化覆盖模型,专注于关键的、有意义的值或状态。
1 2 3 4 5 6 7 8 9 10 11 12 13 14 15 16 17 18 19 program main; bit [0 :2 ] y; bit [0 :2 ] values[$]= '{1 ,6 ,3 ,7 ,3 ,4 ,3 ,5 }; covergroup cg; cover_point_y : coverpoint y { ignore_bins ig = {1 ,2 ,3 ,4 ,5 }; } endgroup cg cg_inst = new (); initial foreach (values[i])begin y = values[i]; cg_inst.sample (); end endprogram
illegal_bins 定义不合法的部分,如果出现这些值直接报错。
cross 在 SystemVerilog 的功能覆盖率(Functional Coverage)中,cross 关键字用于定义交叉覆盖(Cross Coverage)。交叉覆盖是一种分析技术,用于度量两个或多个覆盖点(coverpoints)之间的组合情况。
1 2 3 4 5 6 7 8 9 10 11 12 13 14 15 16 17 18 19 20 21 program main; bit [0 :1 ] y; bit [0 :1 ] y_values[$]= '{1 ,3 }; bit [0 :1 ] z; bit [0 :1 ] z_values[$]= '{1 ,2 }; covergroup cg; cover_point_y : coverpoint y ; cover_point_z : coverpoint z ; cross_yz : cross cover_point_y,cover_point_z ; endgroup cg cg_inst = new (); initial foreach (y_values[i])begin y = y_values[i]; z = z_values[i]; cg_inst.sample (); end endprogram
conditional Coverage 条件覆盖
1 2 3 covergroup CoverPort; coverpoint port iff (!bus_if.reset ); endgroup
当且仅当满足某种条件时才收集sample.