submax{ my($max_so_far) = shift @_; # the first one is the largest yet seen foreach (@_) { # look at the remaining arguments if ($_ > $max_so_far) { # could this one be bigger yet? $max_so_far = $_; } } $max_so_far; }
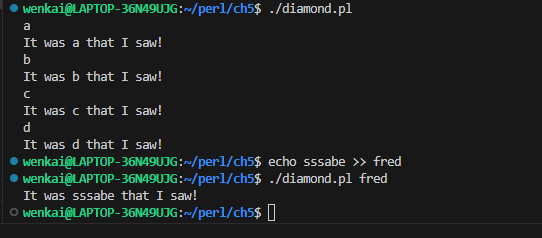
同时我们可以注意到,子程序不一定要先定义后调用,而是可以在调用之后定义。
此外需要注意的是,my关键字通常只定义它后面的一个变量,除非加上括号:
1
2
my $fred, $barney; # WRONG! Fails to declare $barney my($fred, $barney); # declares both
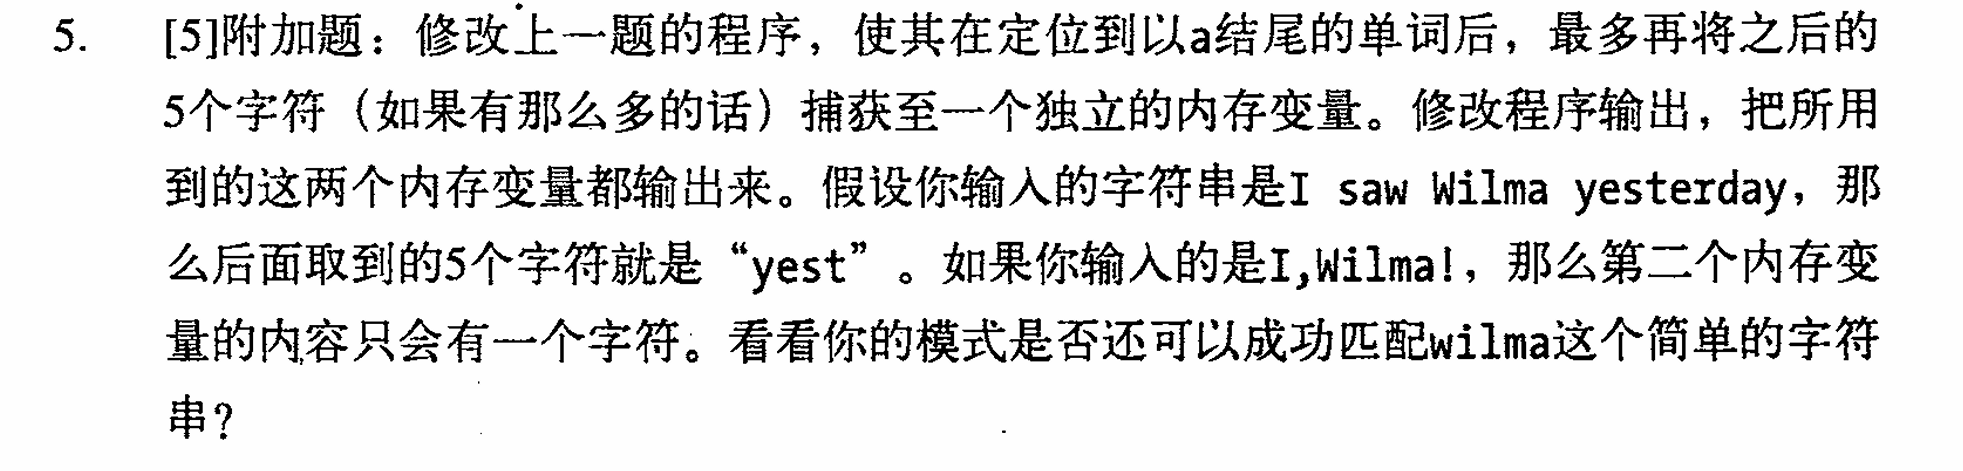
#! /usr/bin/perl #use strict; use v5.12; my $bamm_bamm = 3; # New lexical variable
$bammbamm += 1; # No such variable: Compile time fatal error
使用use v5.12和使用use strict的效果相同。
当程序规模变大时,最后使用strict。一般来讲,任何超过一个屏幕长的程序都应该使用strict.
返回 return
在某些情况下需要提前终止子程序,这是就用到了关键字return:
1 2 3 4 5 6 7 8 9 10 11 12 13 14 15
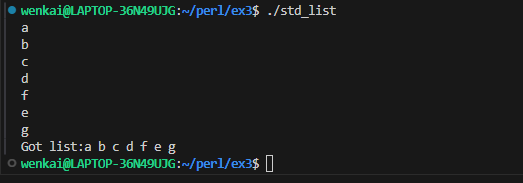
#! /usr/bin/perl #use strict; use v5.12; my @names = qw/ fred barney betty dino wilma pebbles bamm-bamm /; my $result = &which_element_is("dino", @names);
subwhich_element_is{ my($what, @array) = @_; foreach (0..$#array) { # indices of @array's elements if ($what eq $array[$_]) { return $_; # return early once found } } -1; # element not found (return is optional here) }
my @fred = qw{ 1 3 5 7 9 }; my $fred_total = total(@fred); print"The total of \@fred is $fred_total.\n"; print"Enter some numbers on separate lines: "; my $user_total = total(<STDIN>); print"The total of those numbers is $user_total.\n";
subaverage{ my $sum; foreach(@_){ $sum += $_; } $sum/@_; }
subabove_average{ my @above; my $average = average(@_); foreach(@_){ if($_ > $average){ push @above,$_; } } @above; }
my @fred = above_average(1..10); print"\@fred is @fred\n"; print"(Should be 6 7 8 9 10)\n"; my @barney = above_average(100, 1..10); print"\@barney is @barney\n"; print"(Should be just 100)\n";
1 2 3 4 5 6 7 8 9 10 11 12 13 14 15 16 17 18
#! /usr/bin/perl use v5.10;
subgreet{ state $here; if ($here){ say"Hi @_[0]! $here is also here!"; } else{ say"Hi @_[0]! You are the first one here!"; } $here = @_[0]; }
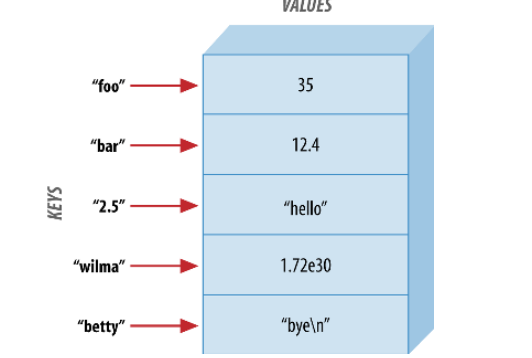
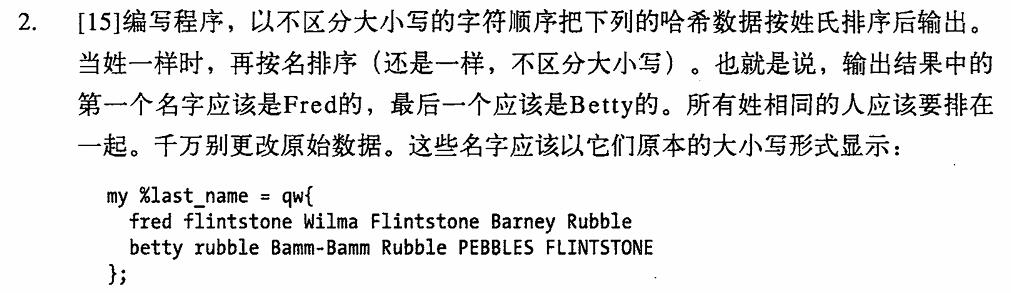
my %last_name = ( fred =>'flintstone', dino =>undef, barney =>'rubble', betty =>'rubble', );
say; say $last_name{fred};
哈希函数
perl内建了很多函数来对哈希进行处理。
keys 和 values
keys 和values会分别返回哈希表的键和值的列表:
1 2 3 4 5 6 7 8 9 10 11
#! /usr/bin/perl use v5.22;
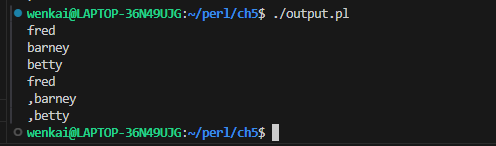
my %hash = ('a' => 1, 'b' => 2, 'c' => 3); my @k = keys %hash; my @v = values %hash; my $count = keys %hash; # gets 3, meaning three key-value pairs
say @k; say @v; say $count;
在标量上下文中,2个函数都会直接返回元素的个数。
each函数
each函数同样用在while循环中,来对哈希表的所有key-value对进行遍历。
1 2 3 4 5 6 7 8 9 10 11 12 13 14 15 16
#! /usr/bin/perl use v5.22;
my %hash = ('a' => 1, 'b' => 2, 'c' => 3);
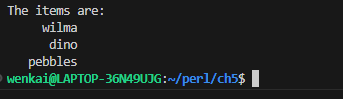
while ( my ($key, $value) = each %hash ) { print"$key => $value\n"; } say'--------------'; foreachmy $key (sortkeys %hash) { my $value = $hash{$key}; print"$key => $value\n"; # Or, we could have avoided the extra $value variable: # print "$key => $hash{$key}\n"; }
$books{'fred'} = 3; $books{'wilma'} = 1; $books{"barney"} = 0; # no books currently checked out $books{"pebbles"} = undef; # no books EVER checked out; a new library card
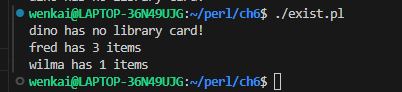
if (exists $books{"dino"}) { print"Hey, there's a library card for dino!\n"; } else { print"dino has no library card!\n"; }
my $person = "barney"; delete $books{$person};
foreachmy $person (sortkeys %books) { # each patron, in order if ($books{$person}) { print"$person has $books{$person} items\n"; # fred has 3 items } }
say"Path is $ENV{PATH}"; say"Display is $ENV{DISPLAY}";
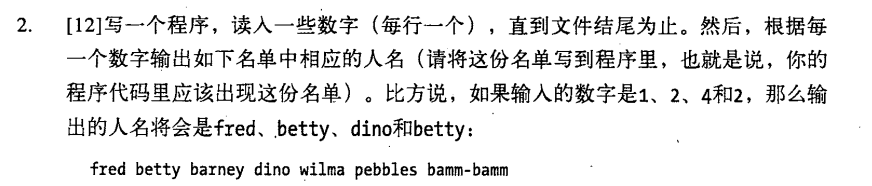
习题
1 2 3 4 5 6 7 8 9 10 11 12 13 14 15 16 17 18 19
#! /usr/bin/perl use v5.22;
my %namelist = ( fred=>"flintstone", barney=>"rubble", wilma=>"flintstone" );
say"input the name you want to know:"; while (chomp(my $name = <STDIN>)){ if (exists $namelist{$name}){ say"$name 's family name is $namelist{$name}"; } else{ say"sorry, I don't konw a person named $name"; } }
print"Would you like to play a game? "; chomp($_ = <STDIN>); if (/yes/i) { # case-insensitive match print"In that case, I recommend that you go bowling.\n"; }
注意修饰符是放在外面的,和被引用的正则表达式不再同一个括号里。因此同样可以写成:
1 2 3 4 5 6 7 8 9
#!/usr/bin/perl
use v5.22;
print"Would you like to play a game? "; chomp($_ = <STDIN>); if (m{yes}i) { # case-insensitive match print"In that case, I recommend that you go bowling.\n"; }
/s进行任意字符的匹配
由于.*可以匹配除了换行符以外的任意字符串,因此为了处理字符串中的换行符,可以用s进行修饰。
1 2 3 4
$_ = "I saw Barney\ndown at the bowling alley\nwith Fred\nlast night.\n"; if (/Barney.*Fred/s) { print"That string mentions Fred after Barney!\n"; }
/-?[0-9]+\.?[0-9]*/ # what is this doing? / -? [0-9]+ \.? [0-9]* /x# a little better
修饰符号的组合
可以将多个修饰符号组合使用,只需要将他们一起放在正则表达式的末尾:
1 2 3
if (/barney.*fred/is) { # both /i and /s print"That string mentions Fred after Barney!\n"; }
1 2 3 4 5 6 7
if (m{ barney # the little guy .* # anything in between fred # the loud guy }six) { # all three of /s and /i and /x print"That string mentions Fred after Barney!\n"; }
use v5.10; my $names = 'Fred or Barney'; if ( $names =~ m/((?<name2>\w+) (and|or) (?<name1>\w+))/ ) { say"I saw $+{name1} and $+{name2}"; }
捕获之后,可是使用\g{label}和\k<label>这样的写法来对其进行反向引用。
1 2 3 4 5
use v5.10; my $names = 'Fred Flintstone and Wilma Flintstone'; if ( $names =~ m/(?<last_name>\w+) and \w+ \k<last_name>/ ) { say"I saw $+{last_name}"; }
use v5.10; if ("Hello there, neighbor" =~ /\s(\w+),/p) { print"That actually matched '${^MATCH}'.\n"; }
if ("Hello there, neighbor" =~ /\s(\w+),/p) { print"That was (${^PREMATCH})(${^MATCH})(${^POSTMATCH}).\n"; }
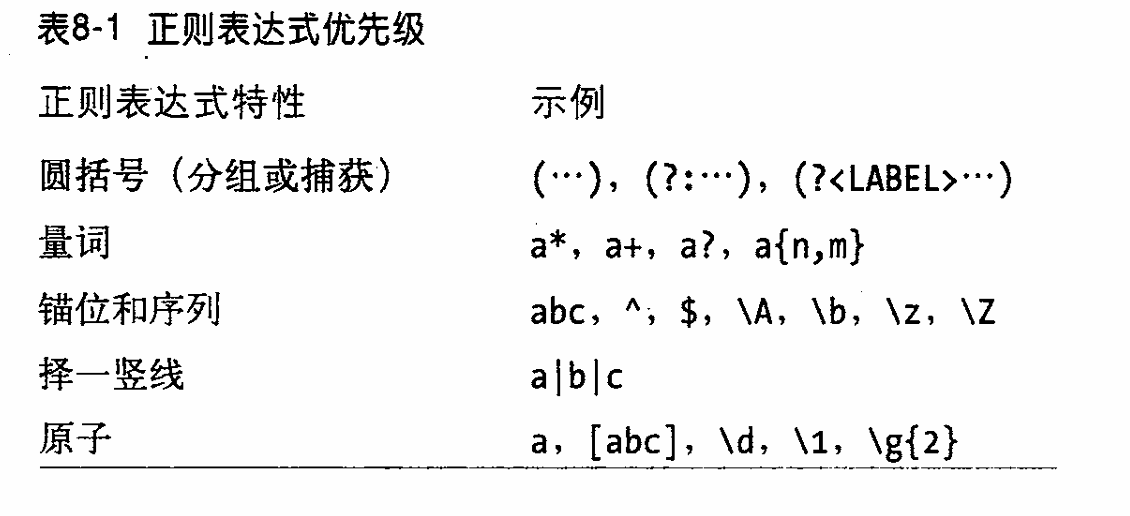
优先级
各类匹配变量的优先级如下表:
测试程序
一个简单的测试正则表达式匹配结果的程序:
1 2 3 4 5 6 7 8
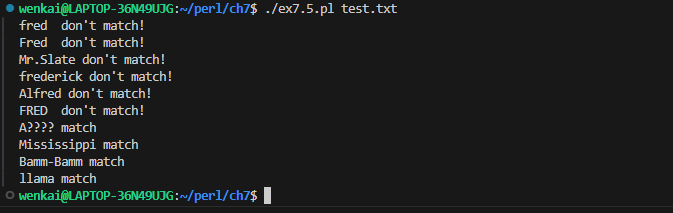
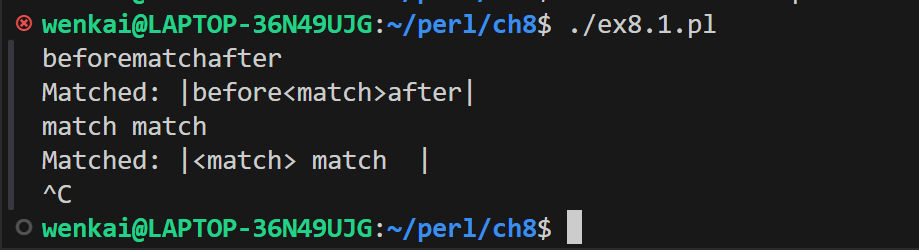
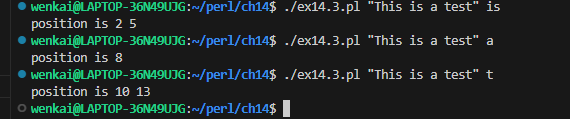
while (<>) { # take one input line at a time chomp; if (/YOUR_PATTERN_GOES_HERE/) { print"Matched: |$`<$&>$'|\n"; # the special match vars } else { print"No match: |$_|\n"; } }
习题
1 2 3 4 5 6 7 8 9 10 11 12 13
#!/usr/bin/perl
use v5.22;
while (<>) { # take one input line at a time chomp; if (/match/) { print"Matched: |$`<$&>$'|\n"; # the special match vars } else { print"No match: |$_|\n"; } }
1 2 3 4 5 6 7 8 9 10 11 12
#!/usr/bin/perl
use v5.22;
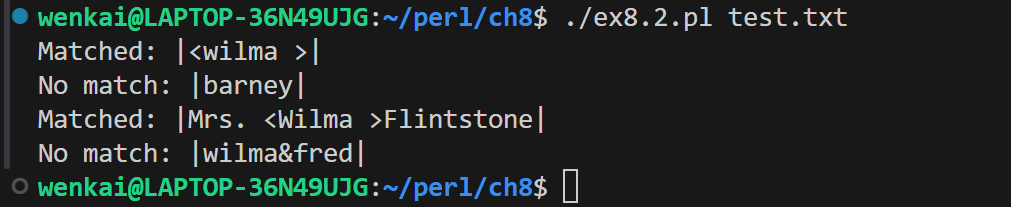
while (<>) { # take one input line at a time chomp; if (/\w*a\s/) { print"Matched: |$`<$&>$'|\n"; # the special match vars } else { print"No match: |$_|\n"; } }
1 2 3 4 5 6 7 8 9 10 11 12
#!/usr/bin/perl
use v5.22;
while (<>) { # take one input line at a time chomp; if (/(\w*a)\s/) { print"\$1 contains $1\n"; # the special match vars } else { print"No match: |$_|\n"; } }
1 2 3 4 5 6 7 8 9 10 11 12
#!/usr/bin/perl
use v5.22;
while (<>) { # take one input line at a time chomp; if (/(?<words>\w*a)\s/) { print"'words' contains $+{words}\n"; # the special match vars } else { print"No match: |$_|\n"; } }
1 2 3 4 5 6 7 8 9 10 11 12
#!/usr/bin/perl
use v5.22;
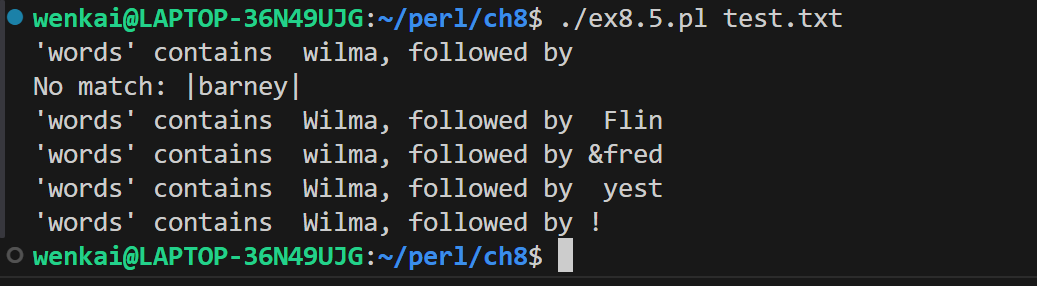
while (<>) { # take one input line at a time chomp; if (/(?<words>\w*a)(?<appends>(\W|\s)\w{0,4})/) { print"'words' contains $+{words}, followed by $+{appends}\n"; # the special match vars } else { print"No match: |$_|\n"; } }
1 2 3 4 5 6 7 8 9 10 11
#!/usr/bin/perl
use v5.22;
while (<>) { # take one input line at a time if (/([ \t]$)/) { print"$_ match...\n"; # the special match vars } else { print"No match: $_\n"; } }
my $y = join"foo", "bar"; # gives just "bar", since no foo glue is needed my @empty; # empty array my $empty = join"baz", @empty; # no items, so it's an empty string
列表上下文中的匹配
在列表上下文中使用m进行匹配时,如果匹配成功,返回的是所有匹配变量的列表,否则返回空列表。
1 2 3 4 5 6 7 8
#!/usr/bin/perl
use v5.22;
my $text = "Fred dropped a 5 ton granite block on Mr. Slate"; my @words = ($text =~ /([a-z]+)/ig); print"Result: @words\n"; # Result: Fred dropped a ton granite block on Mr Slate
如果匹配标量中包含2个及以上的可捕获变量时,可以将其转换为一个哈希表:
1 2 3 4 5 6 7 8 9 10 11 12
#!/usr/bin/perl
use v5.22;
my $text = "Barney Rubble Fred Flintstone Wilma Flintstone"; my %last_name = ($text =~ /(\w+)\s+(\w+)/g);
foreachmy $keys ( keys %last_name) { # each patron, in order if ($last_name{$keys}) { print"$keys => $last_name{$keys}\n"; # fred has 3 items } }
if ( ! defined $dino) { print"The value is undef.\n"; } elsif ($dino =~ /^-?\d+\.?$/) { print"The value is an integer.\n"; } elsif ($dino =~ /^-?\d*\.\d+$/) { print"The value is a _simple_ floating-point number.\n"; } elsif ($dino eq '') { print"The value is the empty string.\n"; } else { print"The value is the string '$dino'.\n"; }
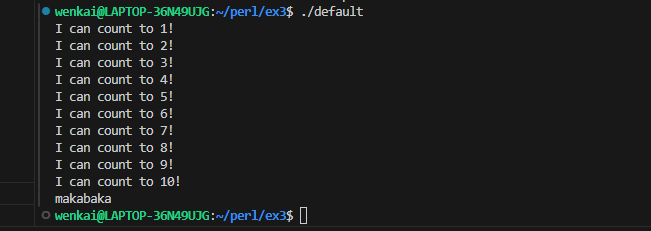
for (1..10) { # really a foreach loop from 1 to 10 print"I can count to $_!\n"; }
循环控制
last操作
相当于C中的break
next操作
相当于C中的continue
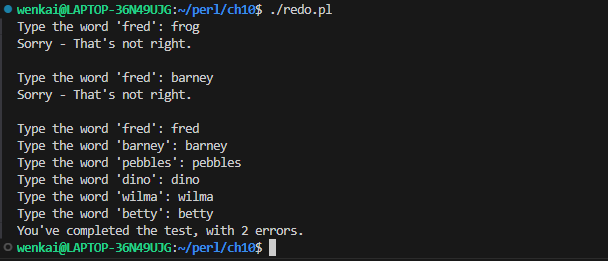
redo操作
重复执行当前循环中的操作。
1 2 3 4 5 6 7 8 9 10 11 12 13 14 15 16 17
#!/usr/bin/perl use v5.22;
# Typing test my @words = qw{ fred barney pebbles dino wilma betty }; my $errors = 0; foreach (@words) { ## redo comes here ## print"Type the word '$_': "; chomp(my $try = <STDIN>); if ($try ne $_) { print"Sorry - That's not right.\n\n"; $errors++; redo; # jump back up to the top of the loop } } print"You've completed the test, with $errors errors.\n";
redo, last 和next都可以在循环中嵌套使用,并且用于跳出或回到最内层循环。
带标签的块
1 2 3 4 5 6 7
LINE: while (<>) { WORD: foreach (split) { last LINE if /__END__/; # bail out of the LINE loop last WORD if /EOL/; # skip the rest of the line ... } }
my $input_dt = Time::Moment->new( year => @ARGV[0], month => @ARGV[1], day => @ARGV[2], );
my $years = $input_dt->delta_years( $dt ); my $months = $input_dt->delta_months( $dt ) % 12; my $days = $input_dt->delta_days( $dt ) % 30; printf"%d years,%d months and %d days \n",$years,$months,$days;
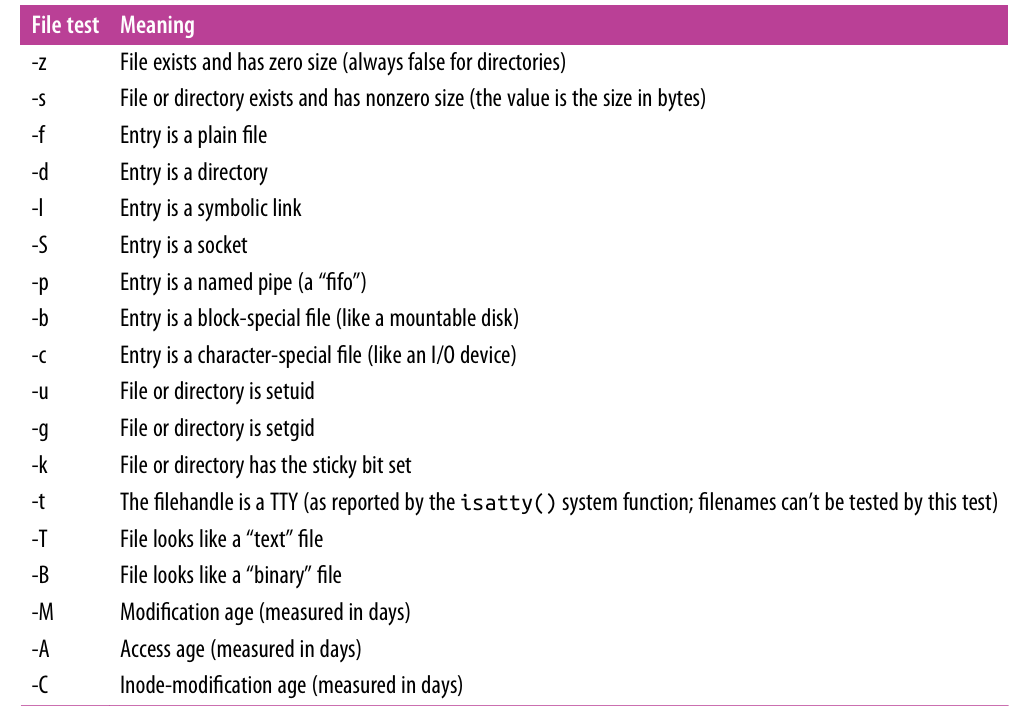
Ch12 文件测试
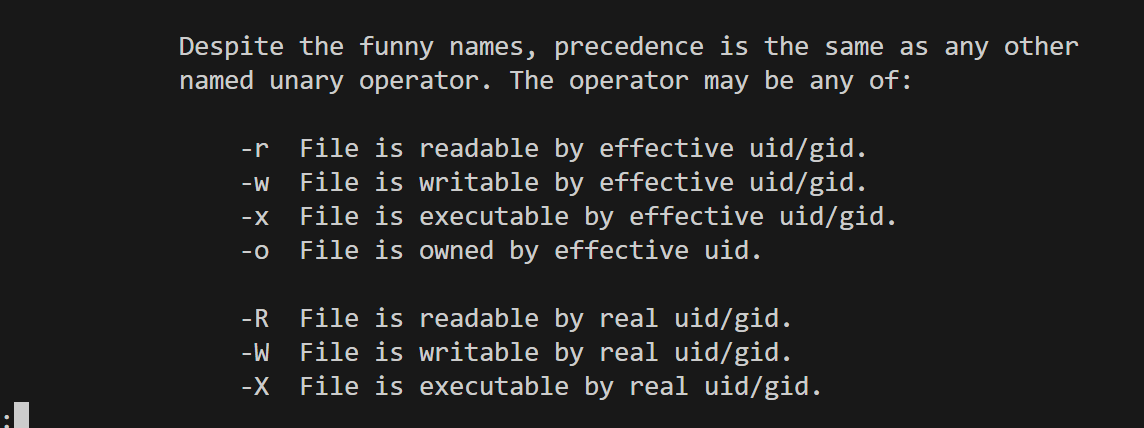
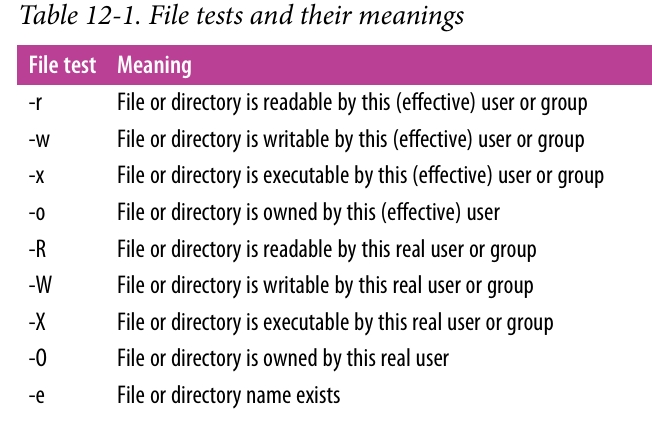
文件测试操作符
使用perldoc -f -X可查看文档:
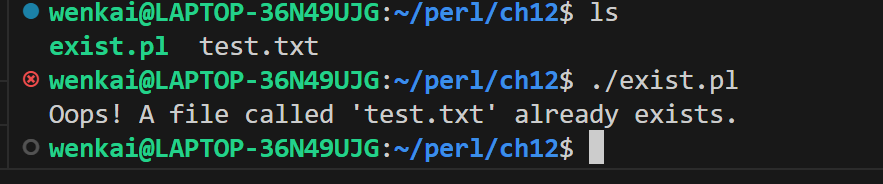
例如,查看文件是否存在,使用-e操作。
1 2 3 4 5 6
#!/usr/bin/perl use v5.24;
my $filename="test.txt"; die"Oops! A file called '$filename' already exists.\n" if -e $filename;
统计大于100K且90天未使用的文件:
1 2 3 4 5 6
my @original_files = qw/ fred barney betty wilma pebbles dino bamm-bamm /; my @big_old_files; # The ones we want to put on backup tapes foreachmy $filename (@original_files) { push @big_old_files, $filename if -s $filename > 100_000and -A $filename > 90; }
my $timestamp = 1454133253; my $date = localtime $timestamp;
say"date: $date";
用于将时间戳转化为人类更容易理解的方式。
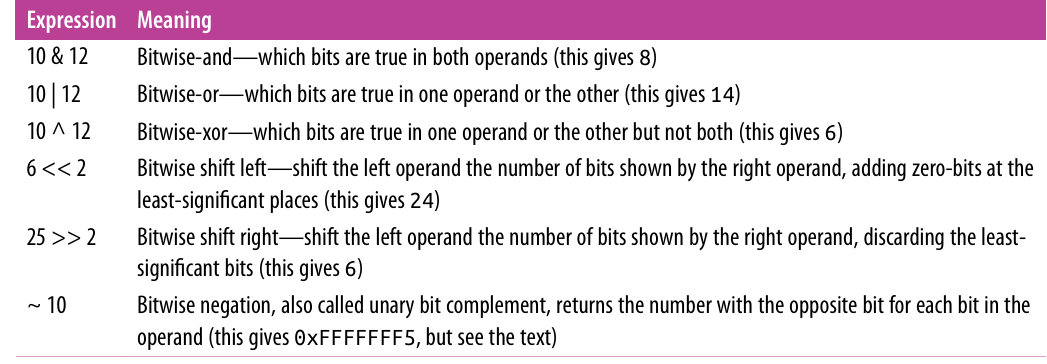
按位运算操作符
与verilog和C中的一样:
按位操作字符串
由于perl的上下文特性,对字符串的按位操作会返回字符串,对整数的按位操作会返回整数。
1 2 3 4 5 6 7
#!/usr/bin/perl use v5.24;
my $s = "\xAA" | "\x55";
sayord($s);
课后习题
1 2 3 4 5 6 7 8 9 10 11
#!/usr/bin/perl use v5.24;
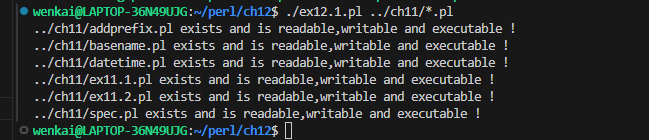
foreach (@ARGV){ if(-e -r -w -x ){ say"$_ exists and is readable,writable and executable !"; } else { say"$_ not exist or is not readable,writable and executable! !" } }
1 2 3 4 5 6 7 8 9 10 11 12 13
#!/usr/bin/perl use v5.24;
my $filename=""; my $age=0; foreach (@ARGV){ if(-A > $age ){ $age = -A $_ ; $filename = $_; } }
say"The oldest file is $filename and it has existed for $age days";
1 2 3 4 5 6 7 8 9
#!/usr/bin/perl use v5.24;
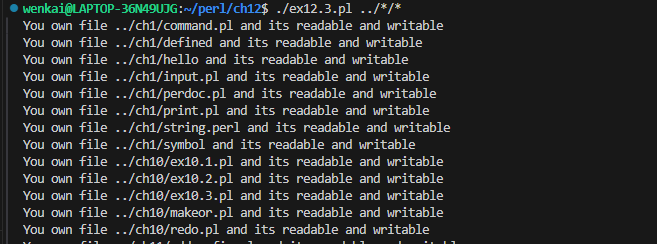
foreach (@ARGV){ if (-r -w -O){ say"You own file $_ and its readable and writable"; } }
Ch13 目录操作
当前工作目录/在目录树中移动
使用chdir操作来改变当前的工作目录,类似shell中的cd命令。
1 2 3 4 5 6 7 8
#!/usr/bin/perl use v5.24; use Cwd;
say"The current working directory is ", getcwd(); chdir'/etc'ordie"cannot chdir to /etc: $!"; say"The current working directory is ", getcwd();
my $now = time; my $ago = $now - 24 * 60 * 60; # seconds per day utime $now, $ago, glob'*'; # set access to now, mod to a day ago
第一个参数是访问时间,第二个参数是修改时间。
习题
1 2 3 4 5 6 7 8 9 10 11 12 13 14
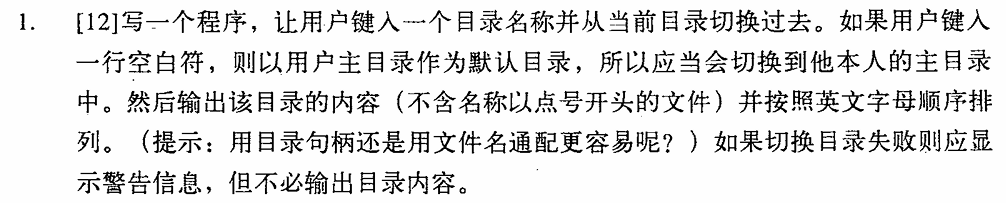
#!/usr/bin/perl use v5.24; use Cwd; say"Please give me a directory:"; chomp(my $dir = <>); my $username = getpwuid($<); $dir = "/home/$username"unless $dir; chdir $dir; say"The current working directory is ", getcwd();
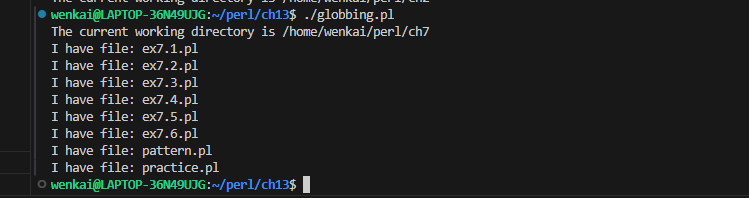
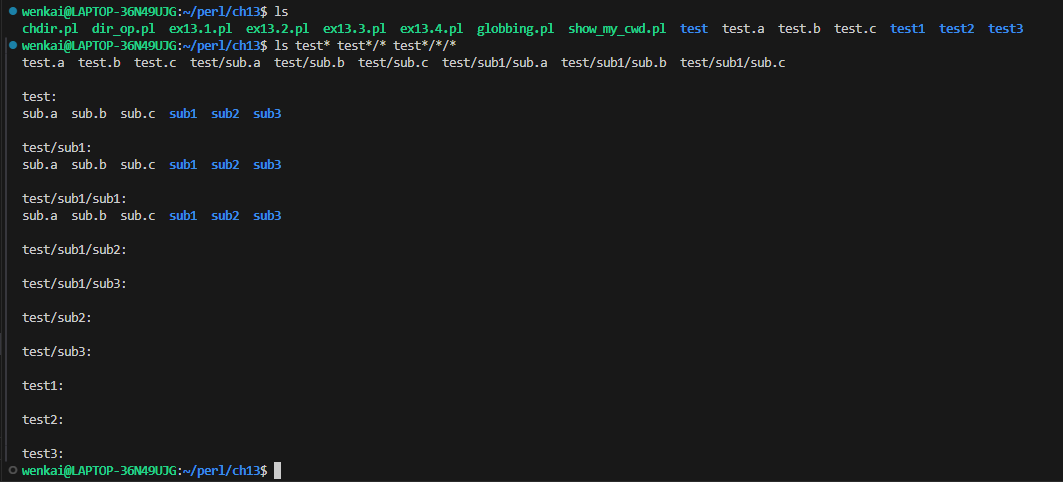
my @files = glob"*"; foreach (sort @files){ say"You have file/dirctory: $_"; }
1 2 3 4 5 6 7 8 9 10 11 12 13 14
#!/usr/bin/perl use v5.24; use Cwd; say"Please give me a directory:"; chomp(my $dir = <>); my $username = getpwuid($<); $dir = "/home/$username"unless $dir; chdir $dir; say"The current working directory is ", getcwd();
my @files = glob".* *"; foreach (sort @files){ say"You have file/dirctory: $_"; }
1
2
3
4
5
6
7
8
9
10
11
12
13
14
15
#!/usr/bin/perl use v5.24; use Cwd; say"Please give me a directory:"; chomp(my $dir = <>); my $username = getpwuid($<); $dir = "/home/$username"unless $dir; chdir $dir; say"The current working directory is ", getcwd();
opendirmy $dh, $dir ordie"Cannot open $dir: $!"; foreach (sortreaddir $dh){ say"You have file/dirctory: $_"; } closedir $dh;
subbig_money{ my $number = sprintf"%.2f", shift @_; # Add one comma each time through the do-nothing loop 1while $number =~ s/^(-?\d+)(\d\d\d)/$1,$2/; # Put the dollar sign in the right place $number =~ s/^(-?)/$1\$/; $number; }
my @winners = sort by_score_and_name keys %score; subby_score_and_name{ $score{$b} <=> $score{$a} # by descending numeric score or $a cmp $b # code point order by name }
foreach (@winners){ say"$_ get $score{$_} scores"; }
实际应用中,可以定义多重比较规则:
1
2
3
4
5
6
7
@patron_IDs = sort { &fines($b) <=> &fines($a) or $items{$b} <=> $items{$a} or $family_name{$a} cmp $family_name{$b} or $personal_name{$a} cmp $family_name{$b} or $a <=> $b } @patron_IDs;